Showing posts with label WinCC. Show all posts

Tuesday, 7 March 2023

S7-PLC DB Simulator - FREE

- 0 komentar

 Hello innovators!


Let me introduce our latest innovation: S7DBSim, a simple Windows application that can simulate Data Block of Siemens S7-PLC.

This video shows how to use the application and how it communicates with WinCC.


00:00 - How to use S7DBSim

04:47 - Test with WinCC


It's FREE, please download the Zip file from here: 

https://mega.nz/file/piokQZAK#1YAJ5tALloWbyasTRty8h-YzdcLv7ImDoqheWhLQ4lA


This app use Snap7 library: 

https://github.com/SCADACS/snap7


I hope this application will be useful for you. If you have any questions or suggestions, please write them in a comment or by email.


Thanks and have a nice day!

[Continue reading...]

Thursday, 18 February 2021

WinCC PDL Resize trick - Picture Window

- 0 komentar
How to resize current WinCC page (PDL) with small resolution convert to bigger resolution.

[Continue reading...]

Thursday, 11 October 2018

OPC to SQL C#

- 0 komentar
We make C# project of OPC2SQL, here is the screenshoot


Please read our article to know more about OPC2SQL application, here :

Like VB version of OPC2SQL, this C# source code is also Not Free. 
Please contact us by email ( hadiScada@gmail.com )

Thank you.
[Continue reading...]

Saturday, 23 July 2016

OPC to SQL

- 2 komentar
OPC2SQL is a simple tool/application for polling data from OPC Server to SQL Database periodically.

The block diagram:

OPC Server         : WinCC, RSLinx, etc.
SQL Database : MySQL, MS SQL Server, etc


Follow the steps below:

1. Open the application.

2. Open Configuration tab, input all data, then Save

3. Make sure with OPC Server and OPC Items.
 

 4. Make sure with Database, Table and Columns.

5. Click Activate on Runtime tab. See the result. 


Please download the demo version HERE.
Contact hadiscada@gmail.com for full version, requests more features, some modifications, and source code.

Thank you.. :)
[Continue reading...]

Saturday, 5 March 2016

Taskbar Show Hide

- 0 komentar
Pernahkah Anda mendapatkan Taskbar Windows menghilang?
Taskbar adalah bar yang defaultnya terdapat di bagian bawah layar, dimana semua aplikasi yang sedang berjalan akan ditampilkan icon-nya. Melalui Taskbar ini kita bisa menampilkan dan menyembunyikan aplikasi yang sedang berjalan.
Taskbar juga sebgai tempat Quick Launch dan Sys Tray. Biasanya aplikasi penting akan meletakan icon kecil sebagai shortcut menu di Sys Tray.
Apa yang membuat saya ingin membahas ini adalah pengalaman saya dengan WinCC. Kami menggunakan PCS 7 v8.1, entah apakah problem ini berlaku juga pada WinCC/PCS 7 versi lain.
Problemnya adalah, ketika WinCC Runtime dijalankan, beberapa saat yang kami tidak tahu pasti (bisa jam/harian/mingguan) setelah itu Taskbar Windows menghilang. Ketika kami menekan tombol Start Windows tidak muncul Taskbar tersebut.
Dengan Taskbar yang hilang, kami tidak bisa melakukan beberapa action terhadap WinCC, seperti Exit Graphic Runtime dan lain-lain.
Oleh sebab itu kami mencari cara untuk bisa menampilkan Taskbar yang hilang tersebut, dan inilah solusinya:

Aplikasi TaskbarShowHide
Aplikasi ini dibuat dengan bahasa VB. Sumbernya kami dapat dari forum di internet. Dengan aplikasi ini kita bisa Show Taskbar dan Hide Taskbar, sederhana.
Berikut langkah-langkah untuk membuatnya:

1. Buka Visual Basic.
2. Pada Form1, tambahkan dua tombol, btnShow dan btnHide seperti berikut:


3. Buka jendela code untuk Form1, dan ketik code berikut:

Public Class Form1

    Private Sub btnShow_Click(sender As Object, e As EventArgs) Handles btnShow.Click
        ShowTaskBar()
    End Sub

    Private Sub btnHide_Click(sender As Object, e As EventArgs) Handles btnHide.Click
        HideTaskBar()
    End Sub
End Class


4. Tambahkan module baru dengan nama Module1.
5. Ketik code berikut:

Option Explicit On

Module Module1

    Private Declare Function FindWindow Lib "user32" Alias "FindWindowA" _
        (ByVal lpClassName As String, ByVal lpWindowName As String) As Integer

    Private Declare Function SetWindowPos Lib "user32" _
        (ByVal hwnd As Integer, ByVal hWndInsertAfter As Integer, ByVal x As Integer, _
         ByVal y As Integer, ByVal cx As Integer, ByVal cy As Integer, _
         ByVal wFlags As Integer) As Integer

    Private Const SWP_HIDEWINDOW = &H80
    Private Const SWP_SHOWWINDOW = &H40

    Public Function HideTaskBar() As Boolean
        Dim lRet As Integer
        lRet = FindWindow("Shell_traywnd", "")
        If lRet > 0 Then
            lRet = SetWindowPos(lRet, 0, 0, 0, 0, 0, SWP_HIDEWINDOW)
            HideTaskBar = lRet > 0
        End If
        Return True
    End Function

    Public Function ShowTaskBar() As Boolean
        Dim lRet As Integer
        lRet = FindWindow("Shell_traywnd", "")
        If lRet > 0 Then
            lRet = SetWindowPos(lRet, 0, 0, 0, 0, 0, SWP_SHOWWINDOW)
            ShowTaskBar = lRet > 0
        End If
        Return True
    End Function
End Module


Run dan cobalah untuk Show/Hide Taskbar.
Selamat mencoba..

[Continue reading...]

Thursday, 11 February 2016

Error While Publishing WinCC WebNavigator

- 1 komentar
Hello friends !

This time I want to share a problem while using WinCC WebNavigator with CEMAT v8.1.
So, maybe this article is suitable for people with experience of WinCC and Web Navigator, because I will not describe some basic steps.


Problem
I have a problem when I do WinCC Web View Publisher Wizard. At the end of the process (Web Publishing Wizard) I get some error, some Picture cannot be published because there are "undefined identifier". Like this:

------- @PG_C_ANNUN8_STANDARD.pdl
Status: Fail
Line: 213    Error:   error  (003f) : undefined identifier 'C_ReadProjStdAS'
Line: 213    Error:   error  (0066) : 'C_ReadProjStdAS' is not a function
Line: 213    Error:   error  (0045) : illegal assignment


------- @C_SetTrendCurves_APL.pdl
Status: Fail
Line: 68    Error:   error  (003f) : undefined identifier 'C_StrngToUpper'
Line: 68    Error:   error  (0066) : 'C_StrngToUpper' is not a function
Line: 68    Error:   error  (0007) : different levels of indirection


Analyze
> There are 2 function (fct) which cause Error: 'C_ReadProjStdAS' and 'C_StrngToUpper'
> I check to the folder: D:\CEMAT_CS\ WINCC\library\CematBin, the FCT files is already exist there.
> I open the pdl, then search for some script within faceplate. I found script on some object, which call the function 'C_ReadProjStdAS'. When I compile the script, Error happens.

Solution
The first step is: googling... haha.
from many discussions on Siemens forum, I get this Solution.
The Solution is: Regenerate Header
Open Global script C editor, then click on menu Options > Regenerate Header
After finish, try to compile the script on the faceplate. It must be no error right now. Then you can do Web Publich again.


Good luck!


[Continue reading...]

Sunday, 22 November 2015

Print Screen WinCC - Landscape & White Background

- 2 komentar
Postingan kali ini saya ingin berbagi trik bagaimana mencetak screen WinCC dengan format Landscape dan Background dengan warna putih.

WinCC adalah software HMI/SCADA dari Siemens. Bagi Anda yang sering menggunakan WinCC mungkin tahu bahwa di-header atas HMI Runtime ada tombol kecil untuk mencetak tampilan (Print Screen). Pernahkah Anda menggunakannya? 
Jika jawaban Anda adalah pernah, kemungkinan besar hasil cetakan Printer akan menampilkan tampilan apa adanya, seluruh tampilan akan di-print, dan dengan format Potrait (panjang ke bawah). 

Bug script pada WinCC v8.1
Default tombol dan fungsi Print tersebut sebenarnya tidak ada masalah (bugs) kecuali yang saya dapatkan pada WinCC versi 8.1, yang script-nya (SSMHardCopy) sebagai berikut:
.....
strncpy (szFullCommandLine, "PrtScr", sizeof (szFullCommandLine));
    sprintf (szNewParameters, " /C=\"%u;%u;%u;%u\" -l", Left, Top, Width, Height );
    strncat (szFullCommandLine, szNewParameters, sizeof (szFullCommandLine));
    SetOperation(lpszPictureName,lpszObjectName,FALSE);
    WinExec( szFullCommandLine,   SW_SHOWNORMAL );
.....

PERHATIKAN baik-baik script diatas, ada satu hal kecil yang terlewat dan itu membuat tombol Print Screen menjadi tidak berfungsi. Satu hal kecil tersebut adalah SPASI. Ya, Spasi, harus ada setelah "/C=". Jadi script yang benar adalah:
.....
sprintf (szNewParameters, " /C= \"%u;%u;%u;%u\" -l", Left, Top, Width, Height );    
.....

Mengubah format menjadi Landscape
Script diatas intinya adalah memanggil sebuah program kecil bernama PrtScr.exe yang merupakan bawaan default instalasi WinCC. File exe tersebut bisa ditemukan pada folder: C:\Program Files (x86)\Common Files\Siemens\Bin
Program PrtScr bisa diberi parameter-parameter tertentu. Misalnya adalah :
 -l    untuk mencetak dalam format Landscape (memanjang ke bawah)

Mengubah warna Background 
Beberapa versi WinCC menggunakan warna cokelat/grey atau warna lain selain warna putih sebagai warna default dari tampilan HMI. Tujuannya mungkin agar nyaman dipandang mata. Tapi jika berurusan dengan Printer, warna-warna tersebut menjadi tidak "nyaman" karena membuat tinta printer menjadi boros. 
Kita bisa mengubah warna background screen menjadi putih sebelum kita mencetak ke Printer, dengan cara menambahkan beberapa script. Namun kami menemukan kendala saat mencoba mengubah script defaultnya yang dalam bahasa C, ternyata kami tidak menemukan script yang bisa mengubah warna background. Akhirnya kami putuskan untuk merubah scriptnya ke dalam bahasa VB. Kurang lebih script intinya seperti ini:
.....
sPic = HMIRuntime.ActiveScreen.Parent.Parent.Parent.ObjectName 
sColor1 = HMIRuntime.Screens("@Screen." & sPic & ":@1001.@DESK").BackColor

HMIRuntime.Screens("@Screen." & sPic & ":@1001.@DESK").BackColor = vbWhite

Set objWShell = CreateObject("WScript.Shell")
strPrint =  "PRTSCR.exe -l /C= " & intLeft & ";" & intTop & ";" & intWidth & ";" & intHeight & " "
objWShell.Run strPrint , 1
Set objWShell = Nothing

HMIRuntime.Screens("@Screen." & sPic & ":@1001.@DESK").BackColor = sColor1
.....

Custom menu 
Untuk memudahkan pemakaian fungsi PrtScr, kami membuat PDL kecil untuk menampilkan menu untuk mengubah setting Print Screen sesuai kebutuhan. Jadi kami meng-copy tombol Print dan kami mengubah "perilaku" event-nya menjadi berikut:
> click kiri      :  mencetak tampilan/screen dengan parameter yang sudah disimpan dalam tooltip
> click kanan  :  untuk menampilkan menu parameter Print Screen


Berikut adalah tampilan dari menu tersebut:


Keterangan:
> Screen : 
1. All Screen     :  mencetak seluruh tampilan screen
2. Workspace    :  mencetak hanya bagian gambar utama (tanpa header dan footer)
> Format :
1. Landscape   :  mencetak dalam format memanjang ke samping
2. Potrait         :  mencetak dalam format memanjang ke bawah
> Background Color :
1. Normal   :  warna background tidak diubah saat print
2. White     :  warna background diubah menjadi Putih saat print
> Save Setting : tombol untuk menyimpan Setting parameter. Setting disimpan ke Tooltip text dari tombol Print Screen (screenshot).
> Print : tombol untuk mencetak


Script-script dan PDL diatas bisa diunduh/download disini.
Demikian ulasan dari kami, semoga bermanfaat dan terima kasih. 


[Continue reading...]

Wednesday, 19 August 2015

My OPC Client XML

- 39 komentar


Note: this article is in Bahasa Indonesia, for English readers please use Google Translate or other translator tools. Email us for more information.

My OPC Client XML

Aplikasi ini adalah versi lanjutan dari MyOPCClient, artikelnya silahkan baca disini.

Pada versi ini, MyOPCClient saat diaktifkan akan langsung membaca file XML berisi tag-tag yang akan dibaca/dimonitor nilainya di OPC Server tertentu, kemudian akan menuliskan nilainya ke file XML lain.
Setting dari aplikasi ini terdapat pada file app.ini yang contohnya seperti ini:


Keterangan:
> ipserver        : adalah IP dari PC dimana terdapat OPC Server
> opcserver     : adalah nama dari OPC Server
> autorefresh   : adalah waktu (dalam milisecond) pembacaan OPC
> autoactive    : 1 untuk aktifkan fitur auto , 0 untuk mematikan fitur auto

Ubahlah setting diatas sesuai yang diinginkan.
Untuk mengubah list tag yang akan dibaca, edit file File2Opc.xml, edit Tagname, biarkan kosong pada bagian Value nya.

Untuk membuat file XML, silahkan baca artikel ini.

Versi demo dari aplikasi ini bisa diunduh disini:
https://drive.google.com/open?id=1KvY0lrV2hgE7eln-lLwYPP_pD8jrEkAI

*klik kanan lalu Save as
*rename file extention dari .JPG menjadi .ZIP

Dalam versi demo, aplikasi hanya berjalan selama 10 menit dan 10 tag yang bisa dimonitor.
Versi lengkap beserta source code project Tidak Gratis (Not Free), untuk yang berminat silahkan hubungi kami via email.


[Continue reading...]

Wednesday, 1 July 2015

Send SMS for WinCC Alarm

- 11 komentar
Dear All,
here is our answer, when a friend ask about: How to send SMS automatically when Alarm is active in WinCC?

Alarm Control Center (ACC) from Siemens is the best tool for this purpose, and many other functionalities for Alarm handling (escalation).

But, if you want to use another application (more cheap/simple), we create a little application called Send_SMS.
Please make sure that you already have a GSM modem for sending SMS and make sure this modem is working. Remember the serial (COM) port which is  used by the modem.

There are 3 kind of work we will do:
1) download the file
2) edit Alarm Logging
3) edit Global Script

1. DOWNLOAD FILES
Please follow these steps:
> download the zip file here.
> rename the file extension from .JPG to .ZIP, then extract the file.
> there are 2 application, send_sms_w.exe is Windows application and send_sms_c.exe is Console.
> test sending SMS using send_sms_w.exe

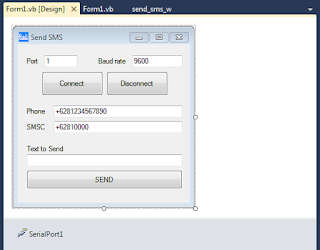
> edit Settings of Port number, Baud rate, destination Phone number, SMS center.
> click Connect button.
> write some text, then click SEND button.
> check incomming SMS on destination phone.
> if the test above is success, then put send_sms_c.exe to the specified location, like on C:\ drive

2. EDIT ALARM LOGGING
> open Alarm Logging from WinCC Explorer.
> select the alarm messages which is you want to send SMS.
> check the Trigger Action option.

3. EDIT SCRIPT
> open Global Script C.
> select Standard functions > Alarm > GMsgFunction
> open the script and edit, to be like this:


#include "apdefap.h"

BOOL GMsgFunction( char* pszMsgData)
{
char s_sms [200];

MSG_RTDATA_STRUCT mRT;
  memset( &mRT, 0, sizeof( MSG_RTDATA_STRUCT ) );

  if( pszMsgData != NULL )
  {
     printf( "Meldung : %s \r\n", pszMsgData );

    // Meldungsdaten einlesen
     sscanf( pszMsgData,  "%ld,%ld,%04d.%02d.%02d,%02d:%02d:%02d:%03d,%ld, %ld, %ld, %d,%d",
&mRT.dwMsgNr,  // Meldungsnummer
&mRT.dwMsgState,   // Status MSG_STATE_COME, .._GO, .._QUIT, .._QUIT_SYSTEM
&mRT.stMsgTime.wYear,  // Jahr
&mRT.stMsgTime.wMonth,  // Monat
&mRT.stMsgTime.wDay, // Tag
&mRT.stMsgTime.wHour,  // Stunde
&mRT.stMsgTime.wMinute, // Minute
&mRT.stMsgTime.wSecond,  // Sekunde
&mRT.stMsgTime.wMilliseconds, // Millisekunde
&mRT.dwTimeDiff, // Zeitdauer der anstehenden Meldung
&mRT.dwCounter, // Interner Meldungszähler
&mRT.dwFlags, // Flags( intern )
&mRT.wPValueUsed,
&mRT.wTextValueUsed );

      // Prozesswerte lesen, falls gewünscht
    } 

  printf("Nr : %d, St: %x, %d-%d-%d %d:%d:%d.%d, Dur: %d, Cnt %d, Fl %d\r\n" , 
  mRT.dwMsgNr, mRT.dwMsgState, mRT.stMsgTime.wDay, mRT.stMsgTime.wMonth, mRT.stMsgTime.wYear, 
  mRT.stMsgTime.wHour, mRT.stMsgTime.wMinute, mRT.stMsgTime.wSecond, mRT.stMsgTime.wMilliseconds, mRT.dwTimeDiff,
  mRT.dwCounter, mRT.dwFlags ) ;

if (mRT.dwMsgState == 1)
{
printf ("send sms..");
sprintf(s_sms, "C:\\send_sms_c.exe 1 9600 +6281234567890 +628100000 \"Test Alarm %d\"", mRT.dwMsgNr);
ProgramExecute(s_sms);
}

   return( TRUE );
}

* the red one is the additional script.
* edit path of file, port number, baud rate, phone number, SMS center

> you can modify the content of message, on the example above, we just send a message number of alarm.
> save and go test runtime WinCC.


Thank you. 
[Continue reading...]

Monday, 15 June 2015

Readback WinCC

- 0 komentar
Readback WinCC adalah sebuah aplikasi untuk membaca nilai dari tag-tag WinCC yang sedang Active (Runtime), lalu menyimpannya ke dalam file. Writeback WinCC disertakan dalam aplikasi ini, berfungsi untuk menuliskan nilai ke Start value dari tag-tag WinCC.
Readback WinCC is an application to Read the values of Active (Runtime) WinCC Tags, and then save it to a file. Writeback WinCC included in this application, is used to Write the to the Start value of WinCC Tags. 

Aplikasi Readback WinCC berguna ketika tag-tag yang menjadi acuan/set-point sering diubah nilainya ketika Runtime. Fitur Runtime Persistence di WinCC bisa menyimpan nilai terakhir dari sebuah tag, namun ketika terjadi kerusakan pada system WinCC, dan mengharuskan untuk membuat projek WinCC baru, maka nilai terakhir dari tag-tag tersebut tidak akan tersimpan, karena tidak ditulis ke Start value dari tag.
Readback WinCC is useful when the Tags values are often changed when Runtime. Runtime Persistence feature in WinCC can store the last value of a tag, but when there is damage to the WinCC system, and requires to create a new WinCC project, the final value of the tags will not be saved, because it is not written into the Start value of the tag.

Tampilan awal saat aplikasi dibuka:
The initial view when the application is opened:

Pilihlah Task yang ingin dilakukan.
Select the Task to do.

Readback WinCC
Tampilan Readback WinCC ketika awal dibuka:
The initial view:


Pilih Input File dengan menekan tombol browse (…). Input File adalah file teks (TXT) yang berisi daftar tag-tag yang akan di-Readback. Format file-nya tampak seperti berikut:
Select Input File by pressing the browse button (...). Input file is a text file (TXT) that contains a list of tags that will be Readback. Its file format looks like the following:


Pilih Output File dengan menekan tombol browse (…). Output File adalah file teks (TXT) yang nantinya akan menyimpan daftar tag-tag yang di-Readback beserta nilainya.
WinCC OPC Node adalah pilihan untuk mengakses OPC Server WinCC. Jika WinCC ada di computer lain, maka ubahlah Local menjadi Remote, dan isi nama computer dimana WinCC tersebut berada.
Select the Output File by pressing the browse button (...). The output file is a text file (TXT) which will keep a list of tags that are Readback along with its value.
WinCC OPC Node is the option to access the WinCC OPC Server. If WinCC is on another computer, then change Local to Remote, and fill in the name of the computer where WinCC is located.


Pastikan WinCC yang akan di-Readback sedang dalam kondisi Active (Runtime).
Tekan tombol Readback untuk memulai proses.
Setelah proses selesai akan tampak seperti berikut:
Ensure WinCC is in a state Active (Runtime).
Press the Readback button to start the process.
Once the process is complete it will look like the following:


File Output akan tampak seperti ini:
The output file will look like this:


Writeback WinCC
Tampilan awal:
The initial view:


Pilih Data File dengan menekan tombol browse (…). Data File adalah file teks (TXT) yang berisi daftar tag-tag yang akan di-Writeback, file ini adalah file output dari proses Readback.
Tampilan ketika proses selesai:
Select Data File by pressing the browse button (...). The data file is a text file (TXT) that contains a list of tags that will be Writeback, this file is a output file of Readback process.
Display when the process is complete:


Source Projek dari aplikasi Readback WinCC silahkan download di sini:
Source Project of Readback WinCC application please download here:
http://drive.google.com/uc?id=0B8Gp4NvQIl8CeEJVRnVsWEVqbEk

[Continue reading...]

Thursday, 25 July 2013

Ack WinCC AlarmOneLine on Click

- 0 komentar


Berawal dari permintaan user WinCC agar bisa melakukan acknowledge alarm di AlarmOneLine (default WinCC) saat di-click, maka kami melakukan berbagai uji coba untuk memenuhi permintaan tersebut.

Saat ini cara untuk me-reset (acknowledge) alarm di AlarmOneLine adalah dengan menekan sebuah tombol yang bernama ShowQuit.

Tadinya kami mengira akan mudah, tinggal copy saja script di tombol ShowQuit kemudian paste di event Click objek Alarm. Tapi ternyata perkiraan kami salah, objek Alarm Control punya kondisi khusus :
1.    Tidak punya event Mouse

Percobaan pertama kami adalah dengan menempatkan sebuah objek yang bisa di-click diatas objek Alarm Control.
Rencananya objek diatasnya itu akan dibuat transparan dan akan dipasang script pada event mouse clicknya. Tapi ternyata objek Alarm Control juga punya kondisi unik yang kedua yaitu :
2.    Selalu diatas objek lain yang bukan objek control


penjelasan lebih lanjut (disertai gambar) silahkan lihat disini..

[Continue reading...]
 
Copyright © . HadiSCADA - Posts · Comments
Theme Template by BTDesigner · Powered by Blogger