Showing posts with label TCP. Show all posts

Sunday, 12 February 2023

Tutorial Modbus TCP Server C# Desktop App

- 1 komentar

Hi inovators! 

This video shows a simple and easy tutorial for creating a Modbus TCP Server application using C# on Visual Studio 2022.

These are the steps:

+ Create a new WinForm .Net Framework project

+ Install Easymodbus package from NuGet.

+ Add some objects.

+ Write the scripts/coding.

+ Test with Modbus TCP Client (ModbusHD).


Download ModbusHD from here: 

https://hadiscada.blogspot.com/2021/05/modbushd-update-version-210.html


Thanks, and have a nice day!

[Continue reading...]

Friday, 27 January 2023

Mac/iOS Apps for Modbus

- 0 komentar

Hi...! 

I build some apps for iOS and Mac for Modbus:


you can download here:https://apps.apple.com/id/developer/hadi-hidayat/id1608282304

Thanks!

[Continue reading...]

Wednesday, 16 September 2020

Multiple Modbus Gateway (Modbus RTU to Modbus TCP)

- 0 komentar


ModGateX (Multiple Modbus Gateway) dibuat oleh HadiSCADA, pada September 2020. 

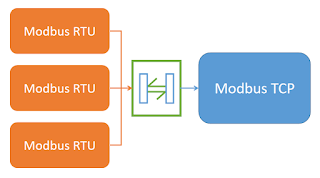
Aplikasi ini berfungsi sebagai penyambung (Gateway) dari beberapa peralatan Modbus, baik Modbus TCP ataupun Modbus RTU. 

Bisa menangani beberapa Input dan beberapa Output (Multiple). Input sebagai Modbus RTU Master atau Modbus TCP Client dan Output sebagai Modbus TCP Server atau Modbus RTU Slave.

Aplikasi ini bisa juga berfungsi sebagai pengubah (Converter) dari Modbus RTU ke Modbus TCP dan atau sebaliknya.

Dalam satu Input bisa dibuat beberapa kelompok (Group) pembacaan register. 

Semua pengaturan Input dan Output bisa disimpan ke dalam file Text, dan bisa dibuka lagi.


Langkah-langkah penggunaaan aplikasi ini: 

1. Configure Inputs dan Group 
2. Configure Outputs dan select Input 
3. Simpan ke file dengan menu File > Save 
4. Mulai jalankan dengan tekan tombol Start 
5. Buka tab Monitor untuk melihat hasil pembacaan 

Berikut adalah video contoh penggunaan aplikasi ini:


Silahkan download aplikasi ini disini:

Silahkan kirimkan laporan jika ada kesalahan pada aplikasi ini, dan atau kirimkan pertanyaan juga saran terkait aplikasi ini ke email kami: hadiScada@gmail.com

Terima kasih.
[Continue reading...]

Sunday, 10 May 2020

Video Tutorial : VB Modbus SCADA with AdvancedHMI

- 0 komentar


Introducing AdvancedHMI to build SCADA (Modbus TCP Client) application in Visual Studio. I do not share the project files, because i think if you follow the steps in video then you can practice and learn better. Thank you.

[Continue reading...]

Saturday, 9 May 2020

Video Tutorial : VB Modbus SCADA House Monitoring

- 0 komentar


How to make SCADA application for House (Simulation) please see the previous video here: https://youtu.be/GMceNxKlq-w TimeSteps: 00:04 Form Modification 09:25 Coding 14:50 Test I do not share the project files, because i think if you follow the steps in video then you can practice and learn better. Thank you.
[Continue reading...]

Thursday, 7 May 2020

Video Tutorial : VB Modbus Multi Clients with Easy

- 2 komentar


This video shows How to create desktop application using Visual Basic language in Microsoft Visual Studio 2019 to connect to multiple Modbus TCP Servers. In this project we will use EasyModbus library browsed from our previous project. and we will use multiple Mod_RSsim as Modbus TCP Server Simulator, can be downloaded from here: http://www.plcsimulator.org/downloads TimeSteps: 00:04 Form Design 07:33 Coding 18:14 Test Connection 21:43 Read and Monitoring The project source code can be downloaded here: https://drive.google.com/open?id=10qhOQDDtHBPnFNSznQoozeW4B6453B6r


Thank you.
[Continue reading...]

Wednesday, 6 May 2020

Video Tutorial : VB Modbus Trending Chart

- 0 komentar
Please see the previous video : Visual Basic Modbus TCP Client to MySQL Database https://youtu.be/QUTkz4FxDjM


This video is the advanced step, now we will create a standard Chart for Trending Realtime monitoring Modbus TCP data. This time we will deactivate logging function to MySQL database because we will focus on Trending function. TimeSteps: 00:04 Form Modification 06:34 Coding 11:27 Test The project source code can be downloaded here: https://drive.google.com/open?id=19eBKlvW_o5SdPKY0SigTkSbXd8qf5n3Q


Thank you.
[Continue reading...]

Tuesday, 5 May 2020

Video Tutorial : VB Modbus TCP Client to MySQL Database

- 2 komentar


Please see the previous video :
Visual Basic Modbus TCP Client
http://hadiscada.blogspot.com/2020/05/video-tutorial-visual-basic-modbus-tcp.html

This video is the advanced step, now we will do monitoring Modbus TCP data then logging to MySQL database.


TimeSteps:
00:04 Form Design
05:50 Setup MySQL Database and Table
07:58 Scripting
17:50 Test


The project source code can be downloaded here:
https://drive.google.com/open?id=1Cv8CU8a_tDqLM3YimtGDiuwmxWwJJ-3m


Thank you.
[Continue reading...]

Monday, 4 May 2020

Video Tutorial : Visual Basic Modbus TCP Client

- 0 komentar


This video shows How to create Modbus TCP Client desktop application using Visual Basic language in Microsoft Visual Studio 2019. In this project we will add EasyModbus library using Nuget Package Manager.
and we will use Mod_RSsim Modbus Simulator, can be downloaded from here: http://www.plcsimulator.org/downloads The project source code can be downloaded here: https://drive.google.com/open?id=1hIRpKCkbE_i5zxXpqpNKh4p6xr8XKLd-


Thank you.
[Continue reading...]

Sunday, 3 May 2020

Modbus Logger Expert

- 2 komentar
ModLogX (Modbus Logger Expert) is an application for logging data from Modbus TCP Server or Modbus RTU Slave to SQL database or File or Cloud, and other function.


The features / functions :
1. Connect to Modbus TCP Server/ RTU Slave or act as Modbus TCP Server/ RTU Slave
2. Tag Management for easy access Modbus Register
3. Trending for each tag or group
4.  Log to file (CSV or TXT)
5. Log to SQL (MS SQL Server or MySQL)
6. Log to cloud (Firebase Realtime Database) for access data from mobile device (optional)
7. Alarm configuration based on status/value of tags
8. SMS notification when alarm active
9. Save all configuration to file and Open from file.


Here are some screenshots and few steps to follow:

> open Connection page, click Edit button (icon pencil) then define the connection.

> open Tag Management page, click Add Group button (icon plus) then create new group with defined Start Modbus Register and Length Register to read. then click Add Tag button to create some tag with each Register address defined.

> click menu File > Save, then write your filename. Make sure your Modbus Server was running (here I use Modbus Simulator), then click Activate button.

 > to show the trending, click on the tag then click Trend button (icon line chart).


for more information please ask us by email to:
hadiScada@gmail.com
or Whatsapp message to:
+6281212129806

Please download ModLogX demo exe file from here:
https://app.box.com/s/4m5xaj4rkeuedkezo1j7a99qvj01z64m


Thank you!
[Continue reading...]

Sunday, 10 February 2019

Modbus (TCP) Client and Logger (CSV)

- 5 komentar
Hello.. here is the VB project of Modbus TCP Client and Logger.
the project using EasyModbus DLL.
the output log file is CSV (comma separated file).

VB form display :

Output CSV file (opened with WPS SpreadSheets) :

the VB project (build using Visual Studio 2010 Express) can be downloaded here :
https://goo.gl/TXNNW8

Thank you..
[Continue reading...]

Tuesday, 13 October 2015

NetBox

- 0 komentar
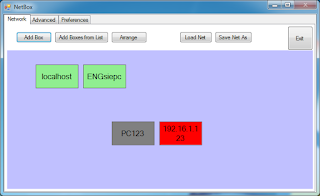
Aplikasi NetBox adalah aplikasi untuk memonitor status koneksi ke beberapa PC atau device yang terhubung di jaringan. Setiap PC ditampilkan dalam bentuk kotak, yang warnanya akan berubah sesuai dengan statusnya.

Berikut adalah tampilannya:

Untuk menambahkan Box baru, klik tombol Add Box. Kita bisa inputkan nama PC atau IP address.


Posisi dari Box bisa digeser dan ditempatkan di manapun kita inginkan. Untuk merapihkan secara otomatis, klik tombol Arrange.
Aplikasi akan secara periodic melakukan Ping ke semua Box, dan menampilkan statusnya dalam warna.

Berikut adalah jenis warna dan statusnya:
> Kuning   :  warna awal, belum dicek
> Hijau      :  status OK.
> Merah    :  status Not OK, ping RTO (Request Time Out)
> Abu        :  status Not OK, tidak bisa mendapatkan IP address

Untuk mengubah (edit) Box, double-click pada Box tersebut atau bisa juga dengan klik-kanan lalu pilih Edit.

Beberapa tombol pada tab Network:
> Add Box                       :  untuk menambah Box baru
> Add Boxes from list     :  untuk menambah Box-box baru dari file text
> Arrange                         :  untuk merapihkan posisi Box
> Load Net                      :  untuk me-load list Box dan posisinya dari file
> Save Net As                 :  untuk menyimpan list Box dan posisinya ke file 

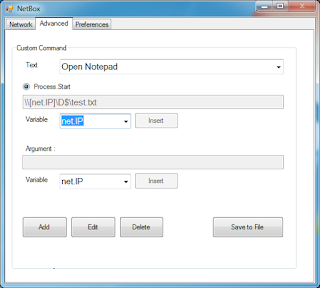
Pada tab Advanced, kita bisa membuat dan mengubah Custom Command yang adalah perintah untuk melakukan sebuah aksi pada Box, misalnya melakukan Remote Desktop atau membuka sebuah file text yang ada di PC Box yang dipilih.


Berikut adalah contoh Command untuk Remote Desktop: 

 Berikut adalah contoh Command untuk Open Notepad:

 Custom Command akan ditampilkan pada menu ketika melakukan klik-kanan pada Box, dan akan dieksekusi saat menu tersebut dipilih, seperti pada gambar berikut:


 Pada tab Preferences, ada pilihan Snap to Grid dengan Grid Size yang bisa diatur, dan pilihan Auto Save Net on Close.


Silahkan download demo Exe-nya disini.


[Continue reading...]

Ping Logger

- 0 komentar
Aplikasi PingLogger adalah aplikasi sederhana untuk melakukan test ping ke komputer atau perangkat lain yang terhubung ke jaringan, kemudian menyimpan status ping tersebut ke sebuah file yang ditentukan.
PingLogger application is a simple application to do PING to a computer or other device connected to the network, and then save the Ping status to a specified file.

Berikut adalah tampilan dari aplikasi PingLogger:
Here is a view of the application PingLogger:

> Target IP bisa diisi dengan 2 target. 
> Cycle adalah peridoe siklus pengecekan ping.
> Tentukan file Text output, bisa juga melalui tombol browse.
> Tombol Start untuk memulai logging, Pause untuk menjeda, dan Stop untuk berhenti.
> Untuk membuka/melihat file output maka klik tombol Open Output File.
- Target IP can be filled with two targets.
- Cycle is a cyclic time to Ping.
- Define Text file output, it could be through the browse button.
- Start button to start logging, Pause to pause, and stop to stop.
- To open / view the output file then click the Open Output File button.

Berikut adalah contoh tampilan dari file output:
Here is an example of the output file:

Silahkan download projek VB dari PingLogger disini.
Please download the VB project of PingLogger here.
[Continue reading...]

Wednesday, 23 July 2014

Simple Scada 2 - Analog Slider & Trend

- 1 komentar
Projek ini adalah projek sederhana untuk membuat objek Slider yang bisa mengubah nilai analog dan objek Trend untuk menampilkan nilainya.
This is a simple project to make a Slider objek for change Analog value, and to make Trend objek to display the value.

Seperti projek sebelumnya (Simple Scada 1), pojek ini juga dibuat dengan VS 2010 Express.
This project is build using VS 2010 Express, like the previous project (Simple Scada 1).

Berikut adalah tampilan design dari projek:
This is the design view of project:


Objek-objeknya terdiri dari komponen Winsock untuk komunikasi ke Modbus TCP Server (yang kali ini kita juga akan menggunakan simulator Mod_RSsim), lalu sebuah textbox untuk Analog Value, objek VScrollBar untuk Slider Analog dan objek Chart untuk Trend Analog, juga beberapa label sebagai pelengkap.
This project consist of Winsock component for communicating with Modbus TCP Server (which is using Mod_RSsim), then a textbox for Analog Value, then a VScrollBar object for Analog Slider, and then Chart object for Analog Trend, and also some label.

Objek TimerRead dan TimerTO fungsinya seperti pada projek sebelumnya, yaitu TimerRead untuk membaca nilai register setiap 1 detik sekali, dan TimerTO untuk waktu Time Out sebuah perintah dikirim ke Modbus Server. Yang baru adalah TimerTrend, yang berfungsi untuk menampilkan nilai dari register ke Chart setiap 1 detik sekali.
TimerRead is for read Modbus register every 1 second. TimerTO is for Time Out command which is send to Modbus Server. The new one is TimerTrend, for displaying analog value from register to Chart every 1 second.

Berikut adalah tampilan ketika projek dijalankan:
This is the runtime view of project:

Pastikan aplikasi Mod_RSsim sudah jalan sebelum projek ini dijalankan.
Make sure that Mod_RSsim is running before Run the project.

Projek SimpleScada_2 bisa diunduh disini:
SimpleScada_2 project can be downloaded here:
http://goo.gl/R1dP0M


Semoga bermanfaat.
[Continue reading...]

Wednesday, 16 July 2014

Simple Scada 1

- 0 komentar

Projek ini adalah projek HMI/Scada sederhana menggunakan VB.Net. Ditujukan untuk anda yang masih tahap dasar dalam mempelajari pembuatan aplikasi HMI/Scada menggunakan VB.Net.
This is a simple HMI/Scada project using VB.net for basic. 

Projek ini dibuat dengan Ms. Visual Studio 2010 Express. Protokol komunikasi yang digunakan adalah Modbus TCP. Kami menggunakan kontrol Winsock untuk komunikasi ke Modbus TCP Server. Jadi ada kontrol yang ditambahkan pada projek ini yaitu Microsoft Winsock Control.
This project build using MS Visual Studio 2010 Express. The protocol is Modbus TCP. We use WinSock component to communicate with Modbus TCP Server. 


Kami menggunakan Mod_RSsim sebagai Modbus Server Simulator. Jadi IP Address yang diset pada kontrol Winsock adalah IP localhost (127.0.0.1).
We use Mod_RSsim as a Modbus Server Simulator. So the IP address for Winsock is localhost IP (127.0.0.1).

Pada projek ini kita akan menampilkan sebuah LED yang warnanya akan Merah jika nilai dari register MW 1 tidak bernilai 1 dan akan berwarna Hijau jika bernilai 1. Ada dua buah tombol, ON dan OFF, untuk menset LED. Juga ada objek Analog Value untuk menunjukan nilai dari register MW 5, disertai textbox New Value dan tombol Write untuk merubah nilai analog tersebut.
In this project, we will show a LED picture which will be Red when the value of Modbus registerMW1 is not equal to 1, and will be Green when it equal to 1. There is a ON and OFF button to set the LED. Also there is a Analog Value to show the value of Register MW5, with a textbox and button to write the value.


Sebelum menjalankan aplikasi ini, pastikan Modbus Server-nya (dalam contoh ini adalah Mod_RSsim) sudah active.
Before run this application, make sure that Modbus Server (Mod_RSsim) is running.

Silahkan diunduh projek SimpleScada_1 ini disini:
The project can be downloaded here:

Untuk simulator modbus Mod_RSsim bisa diunduh disini:
Mod_RSsim can be downloaded here:
http://www.plcsimulator.org/downloads
Artikel lebih lengkap mengenai penggunaan Mod_RSsim silahkan baca disini:
More detail article about Mod_RSsim is here:


Semoga bermanfaat.

[Continue reading...]

Thursday, 26 December 2013

Modbus TCP VB.Net Winsock

- 8 komentar
Sebelumnya kita sudah membuat aplikasi Modbus TCP dengan VB.Net, menggunakan class, disini:
We have created Modbus TCP VB.net application using Class, here:
http://hadiscada.blogspot.com/2013/07/modbus-tcp-sample-vb.html

kemudian kita juga sudah membuat aplikasi Modbus TCP dengan VB6, menggunakan komponen tambahan Winsock (Window Socket), disini:
then we also created Modbus TCP VB6 application using Winsock component, here:
http://hadiscada.blogspot.com/2013/12/modbus-tcp-dengan-vb6.html

Kami melihat, untuk aplikasi yang simple sepertinya lebih mudah untuk menggunakan komponen Winsock, tidak perlu banyak coding. Oleh sebab itulah kami membuat projek VB.net untuk komunikasi dengan Modbus TCP dengan menggunakan Winsock.
We think that for simple application it is better to use Winsock component, less code to write. So we create VB.net project for communication to Modbus TCP using Winsock. 

Tutorialnya mirip dengan tutorial untuk VB6, jadi tidak kami jelaskan langkah-langkahnya.
Yang berbeda pada design form-nya adalah tidak ada lagi textbox untuk menampilkan data Holding Registers, sekarang diganti dengan listbox, tujuannya agar data yang ditampilkan tidak terbatas. Ada dua listbox, untuk list address registernya dan untuk list valuenya.
The tutorial is same with VB6, so here we do not explain the steps.
The difference in form design is, there is no textbox for displaying value of Holding Register, we replace it with listbox, so the numbers of registers to read is unlimited. There are two listboxs, one for register address and other for register value.

Berikut beberapa tampilan:
Here is some screenshots:

    
cara menambahkan komponen pada toolbox: klik kanan > Choose Items.
to add component in toolbox: right click > Choose Items. 

 
menambahkan komponen Winsock.
adding Winsock component. 

 design form.

 
 tampilan saat Read.
display when Read. 

untuk merubah nilai register, double-click pada list value lalu input New value.
to change value of register, double-click on list value then write new value. 


Silahkan unduh source projeknya disini.
The source code of this project can be downloaded here
 
Semoga bermanfaat dan selamat mencoba..
[Continue reading...]

Sunday, 22 December 2013

Modbus TCP VB6 Winsock

- 33 komentar
Visual Basic 6 (VB6 atau VB Classic) memang sudah tua. Microsoft sudah mengeluarkan software programming yang jauh lebih canggih. Terakhir adalah Microsoft Visual Studio 2013. VB6 sudah tidak di-support lagi oleh mereka. Tapi ternyata masih banyak yang menggunakan VB6, baik untuk sekedar belajar pemrograman, atau untuk bekerja membuat aplikasi.
Visual Basic 6 (VB6 or VB classic) is old, Microsoft has release more advance programming software, the last is Microsoft Visual Studio 2013. Microsoft do not support VB6 now. But, there are a lot of people whom still using VB6 for programming, for learn or work.


Berikut ini adalah tutorial bagaimana membuat aplikasi Modbus TCP client dengan VB6.
The following tutorial describe hoe to make VB6 application communicate with Modbus TCP. 

1. Buka VB6.
open VB6.
 
2. Buat project baru, Standard EXE.
Create new project, Standard EXE
 

3. Buatlah beberapa objek berikut pada Form:
Add objects on form like this:
 

- txtIP : textbox untuk input IP address dari device Modbus TCP. "127.0.0.1" adalah IP komputer lokal, kita akan pakai ini karena kita akan pakai Modbus Simulator.
txtIP: textbox for input IP address of device Modbus TCP. "127.0.0.1" is local computer, we will use this because we will use Modbus Simulator.  

- tombol: cmdConnect, cmdDisconnect, cmdRead, cmdWrite
buttons: cmdConnect, cmdDisconnect, cmdRead, and cmdWrite 
- txtStartReg : textbox untuk input alamat pertama dari register Modbus yang akan dibaca/ditulis.
txtStartReg: textbox for input the first register address of Modbus whic will be read/write. 
 - txtLengthReg : textbox untuk input jumlah register yang akan dibaca/ditulis. Pada tutorial ini kami batasi 20, sesuai dengan jumlah textbox untuk datanya, silahkan diedit sendiri apabila kurang.
txtLengthReg: textbox for input the length of registers which will be read/write. In this tutorial the length is limited until 20 as much as textbox for register data. You can change this if need more.  
- txtReg() : textbox yang berindeks, dari 0 sampai 19, berfungsi untuk menampilkan nilai dari register.
txtReg(): indexed textbox, from 0 to 19, for displaying value of registers.  
- komponen Winsock1 : komponen untuk koneksi ke device Modbus TCP. Isi properties RemotePort dengan nilai 502. Jika komponen Winsock pada toolbox tidak ada, klik kanan pada area toolbox lalu klik Components. Carilah komponen Microsoft Winsock Control.
Winsock component: for connect to Modbus TCP device. Set RemotePort property with 502. If the component is not on toolbox, right-click on toolbox area then click Components. Find Microsoft Winsock Control. 
- TimerTO : timer untuk Time Out pembacaan atau penulisan ke Modbus, pada contoh ini kita set properties Interval -nya dengan 1000 (1 detik).
TimerTO: timer for reading or writing Time Out, in this sample we set Interval property to 1000 (1 second). 
- lblStatus : label untuk status dari proses.
lblStatus: label for displaying state of process.

4. Tulis script berikut pada jendela Code:
Write the following script to Code window:

'/// begining of script ///

Dim MbusQuery(11) As Byte
Dim MbusByteArray(255) As Byte
Dim MbusResponse As String
Dim ModbusTimeOut As Integer
Dim MbusRead As Boolean
Dim MbusWrite As Boolean
Dim ModbusWait As Boolean

Private Sub cmdConnect_Click()
Me.MousePointer = vbHourglass
Winsock1.RemoteHost = txtIP.Text
Winsock1.Connect

Dim StartTime
StartTime = Timer

Do While ((Timer < StartTime + 2) And (Winsock1.State <> 7))
    DoEvents
Loop
If (Winsock1.State = 7) Then
   lblStatus.Caption = "Connected"
   lblStatus.BackColor = vbGreen
   cmdConnect.Enabled = False
   cmdDisconnect.Enabled = True
Else
   lblStatus.Caption = "Can't connect to " + txtIP.Text
   lblStatus.BackColor = vbYellow
End If
Me.MousePointer = vbDefault
End Sub

Private Sub cmdDisconnect_Click()
Me.MousePointer = vbHourglass
If (Winsock1.State <> sckClosed) Then
    Winsock1.Close
End If

Dim StartTime
StartTime = Timer

Do While ((Timer < StartTime + 2) And (Winsock1.State <> sckClosed))
    DoEvents
Loop
If (Winsock1.State = sckClosed) Then
    lblStatus.Caption = "Disconnected"
    lblStatus.BackColor = vbRed
    cmdConnect.Enabled = True
   cmdDisconnect.Enabled = False
Else
    lblStatus.Caption = "Error disconnect!"
    lblStatus.BackColor = vbYellow
End If
Me.MousePointer = vbDefault
End Sub

Private Sub cmdRead_Click()
'cek if length is more than 20
If Val(txtLengthReg.Text) > 20 Then
    MsgBox "Can not read more than 20 registers!"
    Exit Sub
End If

Dim StartLow As Byte
Dim StartHigh As Byte
Dim LengthLow As Byte
Dim LengthHigh As Byte
If (Winsock1.State = 7) Then
    StartLow = Val(txtStartReg.Text) Mod 256
    StartHigh = Val(txtStartReg.Text) \ 256
    LengthLow = Val(txtLengthReg.Text) Mod 256
    LengthHigh = Val(txtLengthReg.Text) \ 256
    MbusQuery(0) = 0
    MbusQuery(1) = 0
    MbusQuery(2) = 0
    MbusQuery(3) = 0
    MbusQuery(4) = 0
    MbusQuery(5) = 6
    MbusQuery(6) = 1
    MbusQuery(7) = 3
    MbusQuery(8) = StartHigh
    MbusQuery(9) = StartLow
    MbusQuery(10) = LengthHigh
    MbusQuery(11) = LengthLow
    MbusRead = True
    MbusWrite = False
    Winsock1.SendData MbusQuery
    ModbusWait = True
    ModbusTimeOut = 0
    TimerTO.Enabled = True
Else
    MsgBox ("Device not connected via TCP/IP!")
End If
End Sub

Private Sub cmdWrite_Click()
Dim MbusWriteCommand As String
Dim StartLow As Byte
Dim StartHigh As Byte
Dim ByteLow As Byte
Dim ByteHigh As Byte
Dim i As Integer
If (Winsock1.State = 7) Then
    StartLow = Val(txtStartReg.Text) Mod 256
    StartHigh = Val(txtStartReg.Text) \ 256
    LengthLow = Val(txtLengthReg.Text) Mod 256
    LengthHigh = Val(txtLengthReg.Text) \ 256
       
    MbusWriteQuery = Chr(0) + Chr(0) + Chr(0) + Chr(0) + Chr(0) + Chr(7 + 2 * Val(txtLengthReg.Text)) + Chr(1) + Chr(16) + Chr(StartHigh) + Chr(StartLow) + Chr(0) + Chr(Val(txtLengthReg.Text)) + Chr(2 * Val(txtLengthReg.Text))
    For i = 0 To Val(txtLengthReg.Text) - 1
        ByteLow = Val(txtReg(i).Text) Mod 256
        ByteHigh = Val(txtReg(i).Text) \ 256
        MbusWriteQuery = MbusWriteQuery + Chr(ByteHigh) + Chr(ByteLow)
    Next i
    MbusRead = False
    MbusWrite = True
    Winsock1.SendData MbusWriteQuery
    ModbusWait = True
    ModbusTimeOut = 0
    TimerTO.Enabled = True
Else
    MsgBox ("Device not connected via TCP/IP!")
End If
End Sub

Private Sub TimerTO_Timer()
ModbusTimeOut = ModbusTimeOut + 1
If ModbusTimeOut > 2 Then
    ModbusWait = False
    ModbusTimeOut = 0
    lblStatus.Caption = "Modbus Time Out!"
    lblStatus.BackColor = vbYellow
    TimerTO.Enabled = False
End If
End Sub

Private Sub Winsock1_DataArrival(ByVal bytesTotal As Long)
Dim bData As Byte
Dim j As Byte
For i = 1 To bytesTotal
    Winsock1.GetData bData
    MbusByteArray(i) = bData
Next
j = 0
If MbusRead Then
    For i = 10 To MbusByteArray(9) + 9 Step 2
        txtReg(j).Text = (MbusByteArray(i) * 256) + MbusByteArray(i + 1)
        j = j + 1
    Next i
    lblStatus.Caption = "Registers read"
    lblStatus.BackColor = vbGreen
    For k = j To 19
        txtReg(k).Text = ""
    Next k
    ModbusWait = False
    ModbusTimeOut = 0
    TimerTO.Enabled = False
ElseIf MbusWrite Then
    If (MbusByteArray(8) = 16) And (MbusByteArray(12) = Val(txtLengthReg.Text)) Then
        lblStatus.Caption = "Registers written"
        lblStatus.BackColor = vbGreen
        ModbusWait = False
        ModbusTimeOut = 0
        TimerTO.Enabled = False
    Else
        lblStatus.Caption = "Error writting registers"
        lblStatus.BackColor = vbYellow
    End If
End If
End Sub

'/// end of script ///


5. Jalankan program.
Run the program.
6. Buka Modbus Simulator (Mod RSSim, baca artikelnya disini)
Open Modbus Simulator (Mod RSSim, read the article here)
7. Tekan tombol Connect.
click on Connect button.
8. Setelah berhasil konek (tertulis di lable status: "Connected"), tentukan Start Address yang akan dibaca, kita coba dengan 0, dan Length -nya 20.
After successfully connected (showed in label status: "Connected"), set Start Address which will be read, we try with 0, and the Length is 20.
9. Tekan tombol Read. Jika pembacaan berhasil maka nilai register akan ditampilkan pada textbox txtReg() dan lable status tertulis "Registers read".
Click on Read button. If this works, the values of Holding registers will displayed on textbox txtReg() and the label status shows "Registers read".
 
10. Cobalah mengganti nilai pada txtReg(), misal txtReg(0) kita isi nilai 1 dan txtReg(1) kita isi dengan 2.
Try to change the value in txtReg(), in example txtReg(0) we set to 1 and txtReg(1) set to 2.
12. Tekan tombol Write. Jika penulisan berhasil maka tertulis di label status "Registers written", dan nilai di Modbus Simulator akan berubah.
Click on Write button. If this works, the label status shows "Registers written", and the valus on Modbus Simulator will change.
 

Catatan: setelah sekitar 2 menit, jika tidak terjadi Read atau Write ke Modbus, maka secara otomatis device Modbus akan mematikan koneksi. Jika ini terjadi, lakukan Disconnect lalu Connect lagi.
Note: after 2 minutes, if no Read or Write request to Modbus, the connection will automatically down. if this happen, do Disconnect and the Connect again.

Silahkan download source projek ini disini.
The source code of this project can be downloaded here.

Sekian tutorial dari kami. Semoga bermanfaat dan selamat mencoba..

======================

Update 24 Februari 2014
Modbus TCP VB6 Winsock Version 2

Berikut adalah pengembangan dari projek Modbus TCP VB6 Winsock. Pada veri ini ada beberapa penambahan dan perubahan:
1. Fitur Monitoring Realtime. dengan fitur ini, data yang ditampilkan akan update otomatis setiap 1 detik.
2. Pembacaan Coil Outputs dan Digital Inputs.
3. Maksimal data yang ditampilkan hanya 16 data, agar pas untuk pembacaan Coils dan Inputs.
4. Untuk Digital Inputs tidak bisa dilakukan Write.

Tampilannya seperti ini:

Silahkan download source projek Modbus TCP VB6 Winsock versi 2 ini disini.

Semoga bermanfaat.

[Continue reading...]

Tuesday, 22 October 2013

Modbus Loop

- 0 komentar

Modbus Loop adalah aplikasi VB.net untuk membaca nilai register dari device-device Modbus TCP secara terus menerus (looping).

Project ModbusLoop dibuat dengan VB.net 10.
File EXE dari projek ini bisa diunduh disini.
Source dari projek ini bisa diunduh disini.

Beberapa fungsi utama ModbusLoop adalah :
1. Membaca register Modbus secara periodik.
2. Bisa terkoneksi ke lebih dari satu device Modbus.
3. Ada timer KeepConnect untuk menjaga koneksi ke device Modbus.
4. Pembacaan register Modbus bisa dikelompokan per-Group.
5. Bisa membuat Data dari Address register Modbus, yang ter-monitor secara realtime.
6. Data yang ditampilkan bisa dalam format integer (INT), binary digit (BIT), atau karakter (CHAR).


Pada aritkel kali ini, ModbusLoop tidak terkoneksi langsung ke device Modbus sungguhan, tapi dengan Modbus Simulator. Secara teknis tidak ada perbedaan dan perubahan jika ingin dikonek langsung ke device Hardware Modbus sungguhan, tinggal men-set IP Address dan Slave ID saja.


Berikut adalah pengenalan dan tutorial aplikasi ModbusLoop..


> Download project ModbusLoop.
> Download aplikasi Mod_RSSim.
> Setelah instalasi selesai, buka aplikasi Mod_RSSim.

> Tampilan aplikasi Mod_RSSim tampak seperti berikut:

>  Double-click pada address register 1 (400002), isi dengan nilai 123.

> Isi address register lain, sehingga tampak seperti berikut:

> Biarkan aplikasi Mod_RSSim tetap berjalan.
  
> Buka project ModbusLoop dengan Visual Studio 2010 lalu Run. Atau bisa langsung membuka file EXE nya di folder Debug.
 

> Tampilan aplikasi ModbusLoop seperti berikut:

> Pada panel control ada panel untuk operasi manual (1) dan panel untuk operasi periodik/loop (2)


A.  Membaca register Modbus secara manual.

> Pertama kita akan mencoba membaca register Modbus dari Simulator dengan metode manual.
> Untuk konek secara manual, klik tombol Connect.

> Status yang terlihat saat berhasil terkoneksi.

> Click pada tombol Read Holding Registers. Buka tab Registers dan nilai akan ditampilkan.

> Cobalah membaca Address lain dengan Size berbeda maka hasil yang ditampilkan pada tab Registers juga akan berbeda, seperti berikut:

> Untuk membaca Holding Registers device klik tombol Holding Registers (1). Untuk membaca nilai yang tersimpan di local klik tombol Read Local Registers (2). Untuk memutus koneksi ke device klik tombol Disconnect.

> Status yang terlihat saat memutus koneksi.


B. Membaca secara periodik/looping.

> Selanjutnya kita akan melakukan pembacaan register secara periodik/looping dengan Timer.


Membuat Configurasi Device

> Bukalah tab Config. Tampilan pada tab Config yang masih kosong terlihat seperti ini:

> Tambahkan Network/Device baru dengan menekan tombol '+' di bawah list Network.


> Inputkan nama Network/Device.

> Inputkan IP Address dari Device/Network. Untuk IP Local atau simulator inputkan 127.0.0.1

> Click pada Device/Network yang sudah ditambahkan, lalu click tombol '+' di bawah list Slave.

> Inputkan nama Slave.

> Inputkan Slave/Node Address/number.

> Click pada Slave yang sudah ditambahkan, lalu click tombol '+' di bawah list Group.

> Inputkan nama Group.

> Inputkan Start Address dari Group.

> Tentukan Length atau Size dari Group.

> Di treeview akan tampak sebuah node baru. Untuk melihat detail dari Device, klik pada simbol '+'

> Tampilan treeview setelah membuat Device, Slave dan Group akan terlihat seperti berikut:

> Pada treeview, format untuk Network/Device adalah [nama_device] - [IP address]. Untuk Slave/Node formatnya [nomor_node] - [nama_node]. Untuk Group formatnya [nama_group] - [start_address][[size/length]].

> Buatlah satu Slave lagi dan satu Group di dalamnya, sehingga hasilnya terlihat seperti berikut:

> Cek semua node pada treeview untuk mengaktifkan pembacaan pada semua node.

> Kita bisa menyimpan konfigurasi device ke file dengan menekan tombol Save as Config. Juga bisa me-load config dari file dengan menekan tombol Load Config.

> File konfigurasi device akan disimpan dalam format .cfg. Tampilan saat menyimpan seperti berikut:


> Saat Load File config, pilihlah file config (.cfg) yang akan di-load. Bisa juga dari file .txt asal formatnya sama.


Membuat Configurasi Data

> Bukalah tab Data. Tampilan tab Data yang masih kosong terlihat seperti ini:


> Untuk menambah Data baru, klik tombol Add.
 
> Buatlah Data integer (INT) sebagai berikut:

> Data baru akan terlihat pada list.

> Buatlah Data kedua berupa BIT sebagai berikut:

> Buat Data ketiga berupa CHAR sebagai berikut:

> Kita bisa menyimpan Data register ke file dengan tombol Save File. Juga bisa me-load dari file dengan tombol Load File.

> File Data akan disimpan dalam format .dta. Tampilan saat menyimpan data register:
 
> Saat Load File, pilihlah file data (.dta) yang akan di-load. Bisa juga file .txt asal formatnya sama.


Mengaktifkan Timer Read

> Untuk mengaktifkan pembacaan register secara periodik, klik pada tombol START Timer Read.
 
> Jika semua pembacaan node OK/ tidak ada Error, maka di treeview tab Config, semua node akan berwarna hijau.


Ujicoba Erorr Node

> Di aplikasi Mod_RSSim, cobalah men-disable Slave 2, dengan cara click pada kotak Slave 2.

> Setelah Slave di-disable, warna akan berubah menjadi merah.

> Karena Slave 2 di Modbus Simulator disable, maka pembacaan di ModbusLoop akan Error. Pembacaan yang Error akan membuat warna menjadi merah.

> Untuk melewati node yang Error, uncheck node tersebut. Setelah node yang Error di-uncheck, maka proses pembacaan node tersebut akan dilewati.

> Enable-kan kembali Slave 2. dengan cara klik pada Slave tersebut.

> Setelah Slave di-enable-kan, warna akan berubah menjadi hijau.

> Setelah Slave normal kembali, maka pembacaan akan kembali normal, dan status di treeview akan kembali berwarna hijau (normal).


Mengaktifkan Monitoring Data

> Untuk melihat nilai Data secara realtime, pada tab Data, klik tombol Monitoring ON.

> Pada kondisi Monitoring ON, nilai dari Data akan secara realtime ditampilkan. Untuk mematikan timer Monitoring, klik tombol Monitoring OFF.
 
> Tampilan semua Data pada kondisi Monitoring ON.

>  Cobalah untuk mengganti nilai register di Mod_RSSim, klik 2 kali pada register yg akan diubah.

> Inputkan nilai baru lalu klik OK.

> Setelah nilai register Modbus dirubah, maka nilai yang termonitor juga akan berubah.

> Cobalah untuk mengubah format Data. click Data REG_3 lalu klik tombol Edit.

> Kemudian ubahlah Format-nya ke INT (integer), lalu klik tombol OK.

> Setelah Format dirubah, maka tampilan monitoring juga akan berubah.


Menghentikan Timer Read

> Untuk menghentikan proses pembacaan register, klik tombol STOP Timer Read.


Selamat mencoba..

[Continue reading...]
 
Copyright © . HadiSCADA - Posts · Comments
Theme Template by BTDesigner · Powered by Blogger