Monday, 7 December 2020

Pelatihan Online Membuat Aplikasi SCADA

- 0 komentar


Online Training SCADA Application Development

Silabus Materi Pelatihan Online Membuat Aplikasi SCADA


Materi 1: 

Komunikasi ke peralatan SCADA
a. Modbus TCP
b. Modbus RTU
c. OPC DA Classic
d. IEC 104
e. MQTT


Materi 2:

Menampilkan data 
a. Objek Standar
b. Advanced HMI
c. Live Chart
d. Gauge


Materi 3:

Menyimpan dan membaca data ke/dari Database
a. MySQL
b. MS SQL Server
c. SQLite


Materi 4:

Menyimpan dan membaca data ke/dari File
a. TXT/CSV
b. Excel
c. XML
d. JSON


Materi 5:

Menyimpan dan membaca data ke/dari Cloud
a. Firebase


Materi 6:

Memperindah tampilan aplikasi 
a. WPF Material Design


Materi 7:

Membuat Aplikasi SCADA Lengkap* (Advanced)
a. Tag Management
b. Graphic Designer
c. Picture Navigation
d. Alarm Logging
e. Tag Logging
f. Operation Log
g. Global Script
h. User Administrator
i. Server+Client
j. Redundancy
k. Horn
l. Trending 
m. Popup Picture
n. Save & Load Pictures
o. Reporting
p. Notifikasi Email/SMS


[Continue reading...]

Thursday, 24 September 2020

ModbusHD - Aplikasi Modbus TCP Server/Client, RTU Slave/Master

- 6 komentar

ModbusHD dibuat oleh HadiSCADA. Aplikasi ini bisa dijalankan sebagai Modbus TCP Server atau Modbus TCP Client, atau Modbus RTU Slave, dan atau Modbus RTU Master. Sedikit penjelasan: + pada Modbus TCP, istilah yang dipakai adalah Server-Client. Server sebagai penyimpan data/register dan Client yang membaca (polling). + pada Modbus RTU, istilah yang dipakai adalah Slave-Master. Slave sebagai penyimpan data/register dan Master yang membaca (polling). Cara pakainya silahkan lihat video berikut:


Silahkan download aplikasinya disini: https://hadiscada.com/modbushd/ModbusHD.zip


Demikian dan semoga bermanfaat.

[Continue reading...]

Wednesday, 16 September 2020

Multiple Modbus Gateway (Modbus RTU to Modbus TCP)

- 0 komentar


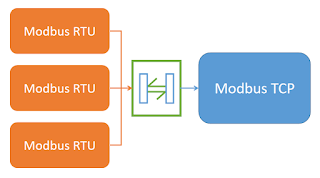
ModGateX (Multiple Modbus Gateway) dibuat oleh HadiSCADA, pada September 2020. 

Aplikasi ini berfungsi sebagai penyambung (Gateway) dari beberapa peralatan Modbus, baik Modbus TCP ataupun Modbus RTU. 

Bisa menangani beberapa Input dan beberapa Output (Multiple). Input sebagai Modbus RTU Master atau Modbus TCP Client dan Output sebagai Modbus TCP Server atau Modbus RTU Slave.

Aplikasi ini bisa juga berfungsi sebagai pengubah (Converter) dari Modbus RTU ke Modbus TCP dan atau sebaliknya.

Dalam satu Input bisa dibuat beberapa kelompok (Group) pembacaan register. 

Semua pengaturan Input dan Output bisa disimpan ke dalam file Text, dan bisa dibuka lagi.


Langkah-langkah penggunaaan aplikasi ini: 

1. Configure Inputs dan Group 
2. Configure Outputs dan select Input 
3. Simpan ke file dengan menu File > Save 
4. Mulai jalankan dengan tekan tombol Start 
5. Buka tab Monitor untuk melihat hasil pembacaan 

Berikut adalah video contoh penggunaan aplikasi ini:


Silahkan download aplikasi ini disini:

Silahkan kirimkan laporan jika ada kesalahan pada aplikasi ini, dan atau kirimkan pertanyaan juga saran terkait aplikasi ini ke email kami: hadiScada@gmail.com

Terima kasih.
[Continue reading...]

Tuesday, 8 September 2020

ESP8266 sebagai pengirim data dari Arduino ke Database SQL

- 0 komentar

Latar belakang permasalahan:

Saya mempunyai Arduino yang berfungsi sebagai pengolah data dari sensor. Kemudian saya ingin menyimpan data-data tersebut ke database SQL. Untuk bagian pembacaan sensor oleh Arduino sudah tidak ada masalah, tapi untuk menyimpan ke SQL bagaimanakah caranya? berikut adalah catatan saya dalam menemukan solusinya.. 

Sekilas mengenai ESP8266 :

Modul Wifi ESP8266 ini sebenarnya adalah sejenis Mikrokontroler juga, karena punya beberapa pin digital input/output, maupun analog dan pin serial. Kelebihan yang paling utama dari modul ini adalah sudah adanya Wifi, sehingga kita bisa memanfaatkannya untuk berkomunikasi dengan perangkat-perangkat lain selama terhubung dalam jaringan TCP/IP. 

Sebenarnya pada Arduino juga bisa kita pakai shield khusus untuk koneksi Ethernet TCP atau Wifi. Hanya karena pada saat ini saya belum bisa mendapatkan modul/shield tersebut maka saya memutuskan untuk memanfaatkan modul Wifi ESP8266 karena kebetulan sudah ada.

Baiklah mari kita mulai. Seperti inilah sistem yang akan kita buat :

- Arduino yang saya pakai adalah Arduino Uno
- modul ESP8266 yang saya pakai adalah NodeMCU Lolin
- IDE yang saya pakai untuk programming Arduino dan ESP adalah Arduino IDE,
- SQL database yang saya pakai adalah MySQL,
- web server platform yang saya pakai adalah Laragon.
- Laptop yang saya pakai sebagai Webserver sudah dilengkapi wifi,
- jaringan LAN saya gunakan Hotspot dari ponsel,
- dari Arduino ke ESP terhubung dengan koneksi Serial TTL
- dari ESP ke Webserver berkomunikasi dengan protokol HTTP POST.


Langkah-langkah :

1. Konfigurasi database MySQL

Dengan asumsi MySQL sudah terinstal di laptop/PC anda, mari kita masuk ke MySQL Workbench (atau bisa pakai HeidiSQL pada platform Laragon) untuk membuat database/schema baru dan beberapa tabel baru.  
- buat database/schema baru dengan nama ardulog 
- buat tabel baru dengan nama tblog dengan kolom-kolom berikut:


2. Konfigurasi Webserver Laragon

Bagi anda yang belum instal Laragon, silahkan download versi portable nya yaitu Laragon Mint dari situs resminya. Setelah itu jalankan aplikasi Laragon dan klik pada tombol Start All untuk mulai mengaktifkan Webserver. Selanjutnya kita akan membuat beberapa file PHP di dalam folder www di lokasi aplikasi Laragon dijalankan. 
- buat file connection.php lalu isi dengan script berikut:
<?php
$conn = new mysqli("localhost","root","123456","ardulog");

// Check connection
if ($conn -> connect_errno) {
  echo "Failed to connect to MySQL: " . $conn -> connect_error;
  exit();
}

?>
yang ditandai kuning adalah user MySQL dan Password-nya, silahkan diganti dengan user dan password anda.

- buat file server_log.php lalu isi dengan script berikut:

<?php
  include("connection.php");

  if(!empty($_POST)){
    $tag = $_POST["tag"];
    $value = $_POST["value"];
        
    $query = "INSERT INTO tblog (tag,value)
            VALUES ('".$tag."','".$value."')";
    if ($conn->query($query) === TRUE) {
      echo "Berhasil menyimpan data ke database";
    } else {
      echo "Error: " . $sql . "<br>" . $conn->error;
    }
  }
  
?>

3. Sketch ESP

Pasang kabel USB ke modul ESP, lalu buka Arduino IDE, pilih Board yang sesuai, saya pilih board NodeMCU 1.0 (ESP-12E Module). Pilih port COM yang sesuai. Tulis script/sketch berikut:

#include <ESP8266WiFi.h>
#include <ESP8266HTTPClient.h>
 
String ssid = "AndroidAP_HD";
String pass = "hadilina8";
String msg = "";  

void setup() {
  Serial.begin(9600);
  ConnectWifi();
}
void loop() {
  if(Serial.available()){      
    while(Serial.available()){
      msg += char(Serial.read());           
    }
  }
  if(msg.startsWith("*") && msg.endsWith("#")){
    Serial.println(msg);
    String cmd = msg;
    msg = "";
    if(cmd.substring(0,7)=="*>POST="){
      int len = cmd.length();
      String ns = cmd.substring(7,len-1);
      String spage = splitString(ns, '$', 0);
      String spost = splitString(ns, '$', 1);
      post2server(spage, spost);      
    }
  }  
}
void ConnectWifi(){    
  WiFi.begin(ssid, pass);
  int i=0;
  while(WiFi.status() != WL_CONNECTED) {
    delay(1000);
    i+=1;
    Serial.print(".");
    if(i>20){
      Serial.println("WiFi failed! ");
      return;
    }
  }
  Serial.println("");
  Serial.println("WiFi connected.");  
  Serial.println(WiFi.localIP());  
}
String splitString(String data, char separator, int index)
{
  int found = 0;
  int strIndex[] = { 0, -1 };
  int maxIndex = data.length() - 1;
  for (int i = 0; i <= maxIndex && found <= index; i++) {
      if (data.charAt(i) == separator || i == maxIndex) {
          found++;
          strIndex[0] = strIndex[1] + 1;
          strIndex[1] = (i == maxIndex) ? i+1 : i;
      }
  }
  return found > index ? data.substring(strIndex[0], strIndex[1]) : "";
}
void post2server(String page, String postData)
{
  HTTPClient http; 
  http.begin(page);
  http.addHeader("Content-Type", "application/x-www-form-urlencoded");
      
  int httpCode = http.POST(postData); 
  String payload = http.getString();  
      
  Serial.println(httpCode); 
  Serial.println(payload);  
      
  http.end();
}

    
yang saya tandai kuning adalah nama Access point (SSID) dan Password untuk Wifi, silahkan ganti dengan SSID dan Password hotspot wifi anda.
Upload sketch.

4. Sketch Arduino

Pasang kabel USB ke Arduino, lalu buka Arduino IDE, pilih Board yang sesuai, saya pilih board Arduino/Genuino Uno. Pilih port COM yang sesuai. Tulis script/sketch berikut:

#include "SoftwareSerial.h"

SoftwareSerial ss(2, 3);

int i;

void setup() {
  Serial.begin(9600);
  ss.begin(9600);
  i = 0;
}

void loop() {
  delay(10000);
  i += 1;
  String spost = "*>POST=";
  spost += "http://192.168.43.17/server_log.php";
  spost += "$";
  spost += "tag=loop";
  spost += "&value=";
  spost += i;
  spost += "#";
  ss.print(spost);
  Serial.println(spost);
}
yang saya tandai kuning adalah IP dari PC/laptop webserver, silahkan ganti dengan IP laptop anda. 
Upload sketch.

5. Menyambungkan kabel dari Arduino ke ESP

Pada script Arduino diatas, saya menggunakan pin digital 2 dan 3 untuk komunikasi serial ke ESP, jadi silahkan anda pasang kabel dari pin digital 2 Arduino ke pin serial TX pada ESP, dan pin digital 3 pada Arduino sambung ke pin serial RX pada ESP. 


Setelah Arduino dan ESP tersambung, maka Arduino akan mengirim POST setiap 10 detik sekali. Isinya berupa nilai loop yang akan terus bertambah. Jika tidak ada masalah maka table di MySQL akan bertambah setiap 10 detik sekali, seperti berikut: 


Jika menemukan masalah atau data tidak sampai ke SQL, coba reset Arduino dan atau ESP nya. 

Demikian dari kami.. selamat mencoba.. 


[Continue reading...]

Sunday, 10 May 2020

Video Tutorial : VB Modbus SCADA with AdvancedHMI

- 0 komentar


Introducing AdvancedHMI to build SCADA (Modbus TCP Client) application in Visual Studio. I do not share the project files, because i think if you follow the steps in video then you can practice and learn better. Thank you.

[Continue reading...]

Saturday, 9 May 2020

Video Tutorial : VB Modbus SCADA House Monitoring

- 0 komentar


How to make SCADA application for House (Simulation) please see the previous video here: https://youtu.be/GMceNxKlq-w TimeSteps: 00:04 Form Modification 09:25 Coding 14:50 Test I do not share the project files, because i think if you follow the steps in video then you can practice and learn better. Thank you.
[Continue reading...]

Thursday, 7 May 2020

Video Tutorial : VB Modbus Multi Clients with Easy

- 2 komentar


This video shows How to create desktop application using Visual Basic language in Microsoft Visual Studio 2019 to connect to multiple Modbus TCP Servers. In this project we will use EasyModbus library browsed from our previous project. and we will use multiple Mod_RSsim as Modbus TCP Server Simulator, can be downloaded from here: http://www.plcsimulator.org/downloads TimeSteps: 00:04 Form Design 07:33 Coding 18:14 Test Connection 21:43 Read and Monitoring The project source code can be downloaded here: https://drive.google.com/open?id=10qhOQDDtHBPnFNSznQoozeW4B6453B6r


Thank you.
[Continue reading...]

Wednesday, 6 May 2020

Video Tutorial : VB Modbus Trending Chart

- 0 komentar
Please see the previous video : Visual Basic Modbus TCP Client to MySQL Database https://youtu.be/QUTkz4FxDjM


This video is the advanced step, now we will create a standard Chart for Trending Realtime monitoring Modbus TCP data. This time we will deactivate logging function to MySQL database because we will focus on Trending function. TimeSteps: 00:04 Form Modification 06:34 Coding 11:27 Test The project source code can be downloaded here: https://drive.google.com/open?id=19eBKlvW_o5SdPKY0SigTkSbXd8qf5n3Q


Thank you.
[Continue reading...]

Tuesday, 5 May 2020

Video Tutorial : VB Modbus TCP Client to MySQL Database

- 2 komentar


Please see the previous video :
Visual Basic Modbus TCP Client
http://hadiscada.blogspot.com/2020/05/video-tutorial-visual-basic-modbus-tcp.html

This video is the advanced step, now we will do monitoring Modbus TCP data then logging to MySQL database.


TimeSteps:
00:04 Form Design
05:50 Setup MySQL Database and Table
07:58 Scripting
17:50 Test


The project source code can be downloaded here:
https://drive.google.com/open?id=1Cv8CU8a_tDqLM3YimtGDiuwmxWwJJ-3m


Thank you.
[Continue reading...]

Monday, 4 May 2020

Video Tutorial : Visual Basic Modbus TCP Client

- 0 komentar


This video shows How to create Modbus TCP Client desktop application using Visual Basic language in Microsoft Visual Studio 2019. In this project we will add EasyModbus library using Nuget Package Manager.
and we will use Mod_RSsim Modbus Simulator, can be downloaded from here: http://www.plcsimulator.org/downloads The project source code can be downloaded here: https://drive.google.com/open?id=1hIRpKCkbE_i5zxXpqpNKh4p6xr8XKLd-


Thank you.
[Continue reading...]

Sunday, 3 May 2020

Modbus Logger Expert

- 2 komentar
ModLogX (Modbus Logger Expert) is an application for logging data from Modbus TCP Server or Modbus RTU Slave to SQL database or File or Cloud, and other function.


The features / functions :
1. Connect to Modbus TCP Server/ RTU Slave or act as Modbus TCP Server/ RTU Slave
2. Tag Management for easy access Modbus Register
3. Trending for each tag or group
4.  Log to file (CSV or TXT)
5. Log to SQL (MS SQL Server or MySQL)
6. Log to cloud (Firebase Realtime Database) for access data from mobile device (optional)
7. Alarm configuration based on status/value of tags
8. SMS notification when alarm active
9. Save all configuration to file and Open from file.


Here are some screenshots and few steps to follow:

> open Connection page, click Edit button (icon pencil) then define the connection.

> open Tag Management page, click Add Group button (icon plus) then create new group with defined Start Modbus Register and Length Register to read. then click Add Tag button to create some tag with each Register address defined.

> click menu File > Save, then write your filename. Make sure your Modbus Server was running (here I use Modbus Simulator), then click Activate button.

 > to show the trending, click on the tag then click Trend button (icon line chart).


for more information please ask us by email to:
hadiScada@gmail.com
or Whatsapp message to:
+6281212129806

Please download ModLogX demo exe file from here:
https://app.box.com/s/4m5xaj4rkeuedkezo1j7a99qvj01z64m


Thank you!
[Continue reading...]

Thursday, 6 February 2020

Modsca - Android app

- 0 komentar


Modsca is a simple Android application for online SCADA.
it uses Firebase as Cloud database.
the data source is from Modbus client agent who poll data from Modbus Slave devices then upload it to cloud (Firebase Realtime Database).
we can also use Modsca for another SCADA protocols, like OPC.


Modsca Android app - part 1/2 (Graphic design)


Modsca Android app - part 2/2 (Runtime)


further information please contact:
hadiScada@gmail.com
[Continue reading...]

Friday, 31 January 2020

Dashboard Designer

- 0 komentar


Dashboard Designer is a Windows desktop application to create HMI (Human Machine Interface) / SCADA (Supervisory, Control and Data Aquisition) application dashboard.
it can connect to various protocol/data source like OPC.
the project is saved in XML file, and can be uploaded/downloaded to/from Cloud (Firebase) storage.


Dashboard Designer - Part 1/3 (Graphic)

Dashboard Designer - Part 2/3 (Connection & Runtime)

Dashboard Designer - Part 3/3 (File Open-Save/Upload-Download)


if you need more information please contact to: hadiScada@gmail.com

Thanks.
[Continue reading...]
 
Copyright © . HadiSCADA - Posts · Comments
Theme Template by BTDesigner · Powered by Blogger