Sunday 22 November 2015

Print Screen WinCC - Landscape & White Background

- 2 komentar
Postingan kali ini saya ingin berbagi trik bagaimana mencetak screen WinCC dengan format Landscape dan Background dengan warna putih.

WinCC adalah software HMI/SCADA dari Siemens. Bagi Anda yang sering menggunakan WinCC mungkin tahu bahwa di-header atas HMI Runtime ada tombol kecil untuk mencetak tampilan (Print Screen). Pernahkah Anda menggunakannya? 
Jika jawaban Anda adalah pernah, kemungkinan besar hasil cetakan Printer akan menampilkan tampilan apa adanya, seluruh tampilan akan di-print, dan dengan format Potrait (panjang ke bawah). 

Bug script pada WinCC v8.1
Default tombol dan fungsi Print tersebut sebenarnya tidak ada masalah (bugs) kecuali yang saya dapatkan pada WinCC versi 8.1, yang script-nya (SSMHardCopy) sebagai berikut:
.....
strncpy (szFullCommandLine, "PrtScr", sizeof (szFullCommandLine));
    sprintf (szNewParameters, " /C=\"%u;%u;%u;%u\" -l", Left, Top, Width, Height );
    strncat (szFullCommandLine, szNewParameters, sizeof (szFullCommandLine));
    SetOperation(lpszPictureName,lpszObjectName,FALSE);
    WinExec( szFullCommandLine,   SW_SHOWNORMAL );
.....

PERHATIKAN baik-baik script diatas, ada satu hal kecil yang terlewat dan itu membuat tombol Print Screen menjadi tidak berfungsi. Satu hal kecil tersebut adalah SPASI. Ya, Spasi, harus ada setelah "/C=". Jadi script yang benar adalah:
.....
sprintf (szNewParameters, " /C= \"%u;%u;%u;%u\" -l", Left, Top, Width, Height );    
.....

Mengubah format menjadi Landscape
Script diatas intinya adalah memanggil sebuah program kecil bernama PrtScr.exe yang merupakan bawaan default instalasi WinCC. File exe tersebut bisa ditemukan pada folder: C:\Program Files (x86)\Common Files\Siemens\Bin
Program PrtScr bisa diberi parameter-parameter tertentu. Misalnya adalah :
 -l    untuk mencetak dalam format Landscape (memanjang ke bawah)

Mengubah warna Background 
Beberapa versi WinCC menggunakan warna cokelat/grey atau warna lain selain warna putih sebagai warna default dari tampilan HMI. Tujuannya mungkin agar nyaman dipandang mata. Tapi jika berurusan dengan Printer, warna-warna tersebut menjadi tidak "nyaman" karena membuat tinta printer menjadi boros. 
Kita bisa mengubah warna background screen menjadi putih sebelum kita mencetak ke Printer, dengan cara menambahkan beberapa script. Namun kami menemukan kendala saat mencoba mengubah script defaultnya yang dalam bahasa C, ternyata kami tidak menemukan script yang bisa mengubah warna background. Akhirnya kami putuskan untuk merubah scriptnya ke dalam bahasa VB. Kurang lebih script intinya seperti ini:
.....
sPic = HMIRuntime.ActiveScreen.Parent.Parent.Parent.ObjectName 
sColor1 = HMIRuntime.Screens("@Screen." & sPic & ":@1001.@DESK").BackColor

HMIRuntime.Screens("@Screen." & sPic & ":@1001.@DESK").BackColor = vbWhite

Set objWShell = CreateObject("WScript.Shell")
strPrint =  "PRTSCR.exe -l /C= " & intLeft & ";" & intTop & ";" & intWidth & ";" & intHeight & " "
objWShell.Run strPrint , 1
Set objWShell = Nothing

HMIRuntime.Screens("@Screen." & sPic & ":@1001.@DESK").BackColor = sColor1
.....

Custom menu 
Untuk memudahkan pemakaian fungsi PrtScr, kami membuat PDL kecil untuk menampilkan menu untuk mengubah setting Print Screen sesuai kebutuhan. Jadi kami meng-copy tombol Print dan kami mengubah "perilaku" event-nya menjadi berikut:
> click kiri      :  mencetak tampilan/screen dengan parameter yang sudah disimpan dalam tooltip
> click kanan  :  untuk menampilkan menu parameter Print Screen


Berikut adalah tampilan dari menu tersebut:


Keterangan:
> Screen : 
1. All Screen     :  mencetak seluruh tampilan screen
2. Workspace    :  mencetak hanya bagian gambar utama (tanpa header dan footer)
> Format :
1. Landscape   :  mencetak dalam format memanjang ke samping
2. Potrait         :  mencetak dalam format memanjang ke bawah
> Background Color :
1. Normal   :  warna background tidak diubah saat print
2. White     :  warna background diubah menjadi Putih saat print
> Save Setting : tombol untuk menyimpan Setting parameter. Setting disimpan ke Tooltip text dari tombol Print Screen (screenshot).
> Print : tombol untuk mencetak


Script-script dan PDL diatas bisa diunduh/download disini.
Demikian ulasan dari kami, semoga bermanfaat dan terima kasih. 


[Continue reading...]

Tuesday 13 October 2015

NetBox

- 0 komentar
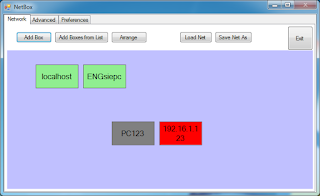
Aplikasi NetBox adalah aplikasi untuk memonitor status koneksi ke beberapa PC atau device yang terhubung di jaringan. Setiap PC ditampilkan dalam bentuk kotak, yang warnanya akan berubah sesuai dengan statusnya.

Berikut adalah tampilannya:

Untuk menambahkan Box baru, klik tombol Add Box. Kita bisa inputkan nama PC atau IP address.


Posisi dari Box bisa digeser dan ditempatkan di manapun kita inginkan. Untuk merapihkan secara otomatis, klik tombol Arrange.
Aplikasi akan secara periodic melakukan Ping ke semua Box, dan menampilkan statusnya dalam warna.

Berikut adalah jenis warna dan statusnya:
> Kuning   :  warna awal, belum dicek
> Hijau      :  status OK.
> Merah    :  status Not OK, ping RTO (Request Time Out)
> Abu        :  status Not OK, tidak bisa mendapatkan IP address

Untuk mengubah (edit) Box, double-click pada Box tersebut atau bisa juga dengan klik-kanan lalu pilih Edit.

Beberapa tombol pada tab Network:
> Add Box                       :  untuk menambah Box baru
> Add Boxes from list     :  untuk menambah Box-box baru dari file text
> Arrange                         :  untuk merapihkan posisi Box
> Load Net                      :  untuk me-load list Box dan posisinya dari file
> Save Net As                 :  untuk menyimpan list Box dan posisinya ke file 

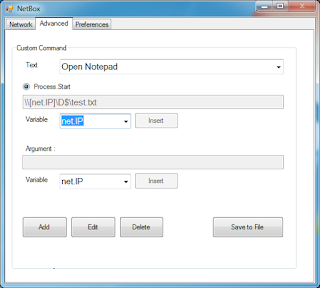
Pada tab Advanced, kita bisa membuat dan mengubah Custom Command yang adalah perintah untuk melakukan sebuah aksi pada Box, misalnya melakukan Remote Desktop atau membuka sebuah file text yang ada di PC Box yang dipilih.


Berikut adalah contoh Command untuk Remote Desktop: 

 Berikut adalah contoh Command untuk Open Notepad:

 Custom Command akan ditampilkan pada menu ketika melakukan klik-kanan pada Box, dan akan dieksekusi saat menu tersebut dipilih, seperti pada gambar berikut:


 Pada tab Preferences, ada pilihan Snap to Grid dengan Grid Size yang bisa diatur, dan pilihan Auto Save Net on Close.


Silahkan download demo Exe-nya disini.


[Continue reading...]

Switch Topic RsLinx

- 0 komentar
Jika anda sering atau pernah menggunakan RsLinx, anda mungkin tahu bahwa setiap koneksi PLC bisa dibuat menjadi sebuah Topic, dan bila koneksi ke PLC lebih dari satu maka bisa dibuat Aliased Topic. RsLinx akan membaca nilai-nilai dari PLC melalui Topic yang menjadi prioritas, jika koneksi tersebut bermasalah maka secara otomatis RsLinx akan mengganti (switch) Topic ke Topic yang lain yang tidak bermasalah.
If you are or have ever used RsLinx, you probably know that each PLC connection can be made into a Topic, and if the connection to the PLC is more than one then it could be made an Aliased Topic. RsLinx will read values from the PLC via the priority Topic, if the connection is problematic then automatically RsLinx will replace (switch) Topic to the other Topic were not problematic.
Namun kami mengalami kondisi dimana RsLinx tidak berhasil melakukan Switch Topic secara otomatis, mungkin karena status koneksi masih terbaca normal padahal nyatanya sedang masalah. Oleh karena itu kami membuat aplikasi sederhana untuk memaksa RsLinx agar melakukan Switch Topic.
But we encounter situations where RsLinx not successfully switch Topic automatically, perhaps because of the connection status still reads normal but in fact was a problem. Therefore we made a simple application to force RsLinx to conduct Switch Topic.

Form dari aplikasi SwitchTopic kami desain seperti ini:
The form of Switch Topic application is something like this:

Namun, kami ubah programnya, agar saat aplikasi dijalankan langsung membaca file text yang berisi Aliased Topic yang akan di-switch.
Perintah SwitchTopic dibaca dari file text yang ditentukan di sourcecode, seperti tampak berikut:
However, we changed the program, so that when the application is run directly read a text file that contains aliased Topic to be switched.
SwitchTopic command read from the specified text file in the source code, as shown below:


Anda perlu mengubah sourcecode nya untuk menyesuaikan dengan kebutuhan anda. Beberapa sourcecode lain mungkin perlu anda ubah juga dan sesuaikan dengan kebutuhan anda.
Perintah Switch Topic sebenarnya adalah melakukan pembacaan asinkron ke tag "@SwitchTopic" yang terdapat di OPC Server RsLinx, seperti tampak pada sourcecode berikut:
You need to change the source code to fit your needs. Some other source code you may need to change as well and adjust to your needs.
Topic Switch command is actually doing the reading asynchronous to the tag "@SwitchTopic" contained in OPC Server RsLinx, as shown in the following source code:


Silahkan download source projeknya disini.
Please download source project here.
[Continue reading...]

Ping Logger

- 0 komentar
Aplikasi PingLogger adalah aplikasi sederhana untuk melakukan test ping ke komputer atau perangkat lain yang terhubung ke jaringan, kemudian menyimpan status ping tersebut ke sebuah file yang ditentukan.
PingLogger application is a simple application to do PING to a computer or other device connected to the network, and then save the Ping status to a specified file.

Berikut adalah tampilan dari aplikasi PingLogger:
Here is a view of the application PingLogger:

> Target IP bisa diisi dengan 2 target. 
> Cycle adalah peridoe siklus pengecekan ping.
> Tentukan file Text output, bisa juga melalui tombol browse.
> Tombol Start untuk memulai logging, Pause untuk menjeda, dan Stop untuk berhenti.
> Untuk membuka/melihat file output maka klik tombol Open Output File.
- Target IP can be filled with two targets.
- Cycle is a cyclic time to Ping.
- Define Text file output, it could be through the browse button.
- Start button to start logging, Pause to pause, and stop to stop.
- To open / view the output file then click the Open Output File button.

Berikut adalah contoh tampilan dari file output:
Here is an example of the output file:

Silahkan download projek VB dari PingLogger disini.
Please download the VB project of PingLogger here.
[Continue reading...]

Friday 21 August 2015

Multi Monitor Picture Viewer

- 0 komentar
This application is used for viewing multi picture on multi monitor. 

Usually this functionality is applied on manufacturing factory to view some instruction sheets, like Bench Work Instruction (BWI).
As we know, in manufacturing factory there are many operators work on production line. Each operator is handle for each step of production. So if we want to put some instruction manual for operator, we must set different instruction for each operator.
Before this, the BWI is printed on paper and pinned on/above operator desk.
We want to make a paperless BWI, so we make this application. With this application, we can change the BWI without printing to paper.
Beside that case (manufacturing factory), this application also can useful for other purpose.


Multi Monitor Picture Viewer

the demo version can downloaded here:
http://drive.google.com/uc?id=0B8Gp4NvQIl8CS2gyNU5qWUwtdkU
*please use Right-click > Save as.
*rename the file extension from .JPG to .ZIP, then extract the file.
*demo version is run only 1 minute.


Notes:
* the number of monitor is checked automatically while app open. if there any install/uninstall monitors, click button Check to re-check the actual screen/monitor.
* the Selected group on combo box is based on config file.
* when we choose a group, the pictures in this group is listed on list view.


Config File

Notes:
* autoactive        :   1=auto is activated when open, 0=auto is not activated
* autogroup        :    the default group to be activated automatic (when app open)
* DO NOT delete or edit the line of this header: Group,Monitor,Description,File,
* all data below the header is separated by Comma.
* the sample pictures is attached, just copy-paste to drive D:\

Manual Tab

We can do manual test for launch picture on selected monitor.
> select the monitor
> write some description
> browse picture file
> click Launch

Testing...
Test with two monitor:


[Continue reading...]

Wednesday 19 August 2015

Converter CSV File to XML File

- 7 komentar


This application/tool is for converting list of Tags with Tagname and Value from CSV file to XML file, which will be used for another application, like MyOPCClient XML.

Download here for the source code :
http://drive.google.com/uc?id=0B8Gp4NvQIl8CLWUzZmg0NnZJQmM

*please use Right-click > Save as.
*rename the file extension from .JPG to .ZIP, then extract the file.
[Continue reading...]

My OPC Client XML

- 39 komentar


Note: this article is in Bahasa Indonesia, for English readers please use Google Translate or other translator tools. Email us for more information.

My OPC Client XML

Aplikasi ini adalah versi lanjutan dari MyOPCClient, artikelnya silahkan baca disini.

Pada versi ini, MyOPCClient saat diaktifkan akan langsung membaca file XML berisi tag-tag yang akan dibaca/dimonitor nilainya di OPC Server tertentu, kemudian akan menuliskan nilainya ke file XML lain.
Setting dari aplikasi ini terdapat pada file app.ini yang contohnya seperti ini:


Keterangan:
> ipserver        : adalah IP dari PC dimana terdapat OPC Server
> opcserver     : adalah nama dari OPC Server
> autorefresh   : adalah waktu (dalam milisecond) pembacaan OPC
> autoactive    : 1 untuk aktifkan fitur auto , 0 untuk mematikan fitur auto

Ubahlah setting diatas sesuai yang diinginkan.
Untuk mengubah list tag yang akan dibaca, edit file File2Opc.xml, edit Tagname, biarkan kosong pada bagian Value nya.

Untuk membuat file XML, silahkan baca artikel ini.

Versi demo dari aplikasi ini bisa diunduh disini:
https://drive.google.com/open?id=1KvY0lrV2hgE7eln-lLwYPP_pD8jrEkAI

*klik kanan lalu Save as
*rename file extention dari .JPG menjadi .ZIP

Dalam versi demo, aplikasi hanya berjalan selama 10 menit dan 10 tag yang bisa dimonitor.
Versi lengkap beserta source code project Tidak Gratis (Not Free), untuk yang berminat silahkan hubungi kami via email.


[Continue reading...]

Wednesday 1 July 2015

Send SMS for WinCC Alarm

- 11 komentar
Dear All,
here is our answer, when a friend ask about: How to send SMS automatically when Alarm is active in WinCC?

Alarm Control Center (ACC) from Siemens is the best tool for this purpose, and many other functionalities for Alarm handling (escalation).

But, if you want to use another application (more cheap/simple), we create a little application called Send_SMS.
Please make sure that you already have a GSM modem for sending SMS and make sure this modem is working. Remember the serial (COM) port which is  used by the modem.

There are 3 kind of work we will do:
1) download the file
2) edit Alarm Logging
3) edit Global Script

1. DOWNLOAD FILES
Please follow these steps:
> download the zip file here.
> rename the file extension from .JPG to .ZIP, then extract the file.
> there are 2 application, send_sms_w.exe is Windows application and send_sms_c.exe is Console.
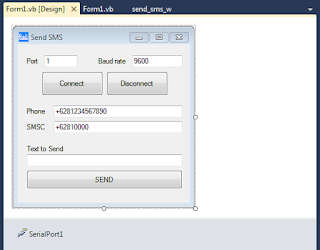
> test sending SMS using send_sms_w.exe

> edit Settings of Port number, Baud rate, destination Phone number, SMS center.
> click Connect button.
> write some text, then click SEND button.
> check incomming SMS on destination phone.
> if the test above is success, then put send_sms_c.exe to the specified location, like on C:\ drive

2. EDIT ALARM LOGGING
> open Alarm Logging from WinCC Explorer.
> select the alarm messages which is you want to send SMS.
> check the Trigger Action option.

3. EDIT SCRIPT
> open Global Script C.
> select Standard functions > Alarm > GMsgFunction
> open the script and edit, to be like this:


#include "apdefap.h"

BOOL GMsgFunction( char* pszMsgData)
{
char s_sms [200];

MSG_RTDATA_STRUCT mRT;
  memset( &mRT, 0, sizeof( MSG_RTDATA_STRUCT ) );

  if( pszMsgData != NULL )
  {
     printf( "Meldung : %s \r\n", pszMsgData );

    // Meldungsdaten einlesen
     sscanf( pszMsgData,  "%ld,%ld,%04d.%02d.%02d,%02d:%02d:%02d:%03d,%ld, %ld, %ld, %d,%d",
&mRT.dwMsgNr,  // Meldungsnummer
&mRT.dwMsgState,   // Status MSG_STATE_COME, .._GO, .._QUIT, .._QUIT_SYSTEM
&mRT.stMsgTime.wYear,  // Jahr
&mRT.stMsgTime.wMonth,  // Monat
&mRT.stMsgTime.wDay, // Tag
&mRT.stMsgTime.wHour,  // Stunde
&mRT.stMsgTime.wMinute, // Minute
&mRT.stMsgTime.wSecond,  // Sekunde
&mRT.stMsgTime.wMilliseconds, // Millisekunde
&mRT.dwTimeDiff, // Zeitdauer der anstehenden Meldung
&mRT.dwCounter, // Interner Meldungszähler
&mRT.dwFlags, // Flags( intern )
&mRT.wPValueUsed,
&mRT.wTextValueUsed );

      // Prozesswerte lesen, falls gewünscht
    } 

  printf("Nr : %d, St: %x, %d-%d-%d %d:%d:%d.%d, Dur: %d, Cnt %d, Fl %d\r\n" , 
  mRT.dwMsgNr, mRT.dwMsgState, mRT.stMsgTime.wDay, mRT.stMsgTime.wMonth, mRT.stMsgTime.wYear, 
  mRT.stMsgTime.wHour, mRT.stMsgTime.wMinute, mRT.stMsgTime.wSecond, mRT.stMsgTime.wMilliseconds, mRT.dwTimeDiff,
  mRT.dwCounter, mRT.dwFlags ) ;

if (mRT.dwMsgState == 1)
{
printf ("send sms..");
sprintf(s_sms, "C:\\send_sms_c.exe 1 9600 +6281234567890 +628100000 \"Test Alarm %d\"", mRT.dwMsgNr);
ProgramExecute(s_sms);
}

   return( TRUE );
}

* the red one is the additional script.
* edit path of file, port number, baud rate, phone number, SMS center

> you can modify the content of message, on the example above, we just send a message number of alarm.
> save and go test runtime WinCC.


Thank you. 
[Continue reading...]

Monday 15 June 2015

Readback WinCC

- 0 komentar
Readback WinCC adalah sebuah aplikasi untuk membaca nilai dari tag-tag WinCC yang sedang Active (Runtime), lalu menyimpannya ke dalam file. Writeback WinCC disertakan dalam aplikasi ini, berfungsi untuk menuliskan nilai ke Start value dari tag-tag WinCC.
Readback WinCC is an application to Read the values of Active (Runtime) WinCC Tags, and then save it to a file. Writeback WinCC included in this application, is used to Write the to the Start value of WinCC Tags. 

Aplikasi Readback WinCC berguna ketika tag-tag yang menjadi acuan/set-point sering diubah nilainya ketika Runtime. Fitur Runtime Persistence di WinCC bisa menyimpan nilai terakhir dari sebuah tag, namun ketika terjadi kerusakan pada system WinCC, dan mengharuskan untuk membuat projek WinCC baru, maka nilai terakhir dari tag-tag tersebut tidak akan tersimpan, karena tidak ditulis ke Start value dari tag.
Readback WinCC is useful when the Tags values are often changed when Runtime. Runtime Persistence feature in WinCC can store the last value of a tag, but when there is damage to the WinCC system, and requires to create a new WinCC project, the final value of the tags will not be saved, because it is not written into the Start value of the tag.

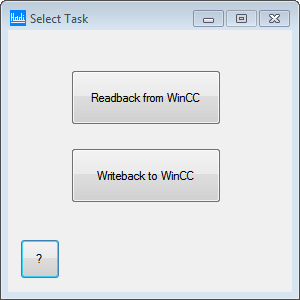
Tampilan awal saat aplikasi dibuka:
The initial view when the application is opened:

Pilihlah Task yang ingin dilakukan.
Select the Task to do.

Readback WinCC
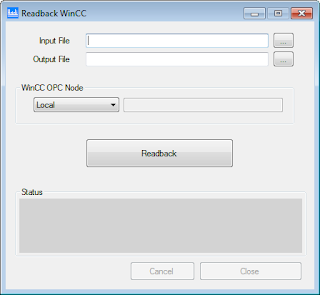
Tampilan Readback WinCC ketika awal dibuka:
The initial view:


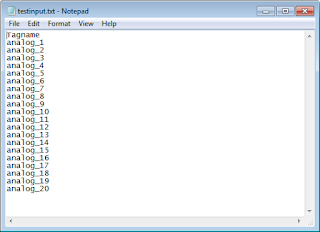
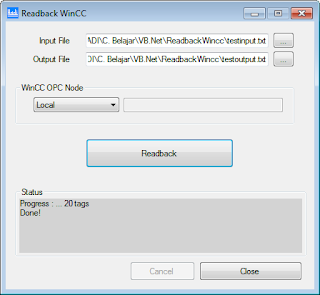
Pilih Input File dengan menekan tombol browse (…). Input File adalah file teks (TXT) yang berisi daftar tag-tag yang akan di-Readback. Format file-nya tampak seperti berikut:
Select Input File by pressing the browse button (...). Input file is a text file (TXT) that contains a list of tags that will be Readback. Its file format looks like the following:


Pilih Output File dengan menekan tombol browse (…). Output File adalah file teks (TXT) yang nantinya akan menyimpan daftar tag-tag yang di-Readback beserta nilainya.
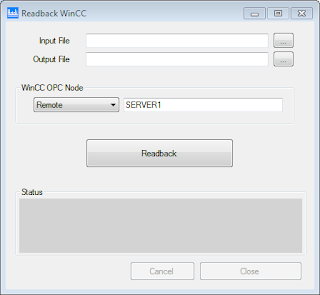
WinCC OPC Node adalah pilihan untuk mengakses OPC Server WinCC. Jika WinCC ada di computer lain, maka ubahlah Local menjadi Remote, dan isi nama computer dimana WinCC tersebut berada.
Select the Output File by pressing the browse button (...). The output file is a text file (TXT) which will keep a list of tags that are Readback along with its value.
WinCC OPC Node is the option to access the WinCC OPC Server. If WinCC is on another computer, then change Local to Remote, and fill in the name of the computer where WinCC is located.


Pastikan WinCC yang akan di-Readback sedang dalam kondisi Active (Runtime).
Tekan tombol Readback untuk memulai proses.
Setelah proses selesai akan tampak seperti berikut:
Ensure WinCC is in a state Active (Runtime).
Press the Readback button to start the process.
Once the process is complete it will look like the following:


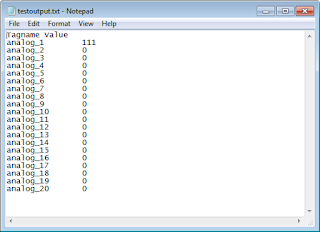
File Output akan tampak seperti ini:
The output file will look like this:


Writeback WinCC
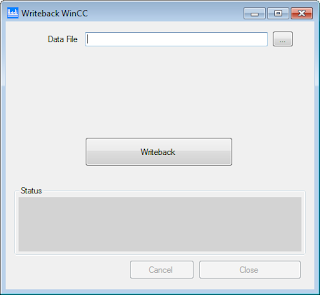
Tampilan awal:
The initial view:


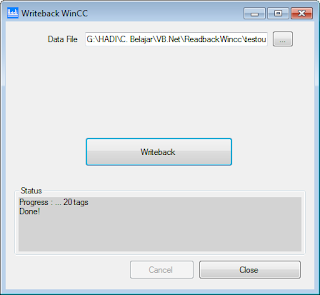
Pilih Data File dengan menekan tombol browse (…). Data File adalah file teks (TXT) yang berisi daftar tag-tag yang akan di-Writeback, file ini adalah file output dari proses Readback.
Tampilan ketika proses selesai:
Select Data File by pressing the browse button (...). The data file is a text file (TXT) that contains a list of tags that will be Writeback, this file is a output file of Readback process.
Display when the process is complete:


Source Projek dari aplikasi Readback WinCC silahkan download di sini:
Source Project of Readback WinCC application please download here:
http://drive.google.com/uc?id=0B8Gp4NvQIl8CeEJVRnVsWEVqbEk

[Continue reading...]

Tuesday 19 May 2015

CyrusConnector : Autoconnect modem by SMS

- 0 komentar
Cyrus adalah aplikasi untuk modem Telkomsel Flash


CyrusConnector adalah aplikasi yang kami buat agar modem bisa melakukan koneksi ke internet melalui perintah dari SMS. aplikasi ini berjalan di "belakang layar" jadi tidak ada tampilannya.

Latar belakang pembuatan aplikasi ini adalah karena ada beberapa komputer kami yang terpasang di tempat yang jauh di luar kota, dan kami ingin mengaksesnya via TeamViewer. Kami memasang modem USB di komputer tersebut. Karena tidak setiap saat komputer tersebut harus terhubung ke internet, maka kami ingin membuat aplikasi yang bisa memeriksa SMS, jika isi SMS tersebut adalah perintah untuk konek ke internet maka aplikasi akan melakukan koneksi internet dengan membuka aplikasi Cyrus dan menekan tombol Connect pada aplikasi tersebut.
Berikut adalah flow dari aplikasi CyrusConnector:

Application Run with OS Startup
> cek cyrus application
- if not run
  > run Cyrus application
> cek SMS inbox
- if there new SMS command to Connect
  > cek internet
  - if not connect
    > show cyrus window
    > set foreground
    > move to zero position
    > click on Connect button

Catatan:
>  simpan aplikasi CyrusConnector pada folder Startup agar bisa berjalan saat Windows startup.
>  untuk mengirim perintah konek, kirim SMS berisi "#connect#" (tanpa tanda petik) ke nomor yang ada di modem.
> aplikasi CyrusConnector baru ditest untuk modem Telkomsel Flash saja, modem lain belum tentu bisa.

Silahkan unduh aplikasi CyrusConnector disini.
*klik-kanan > Save Target As.. atau Save Link As..
*ganti ekstensi .JPG menjadi .EXE
*bagi yang mau source code nya, via email saja ya..

Sekian dan terima kasih.. :)
[Continue reading...]
 
Copyright © . HadiSCADA - Posts · Comments
Theme Template by BTDesigner · Powered by Blogger